
Side Dishes
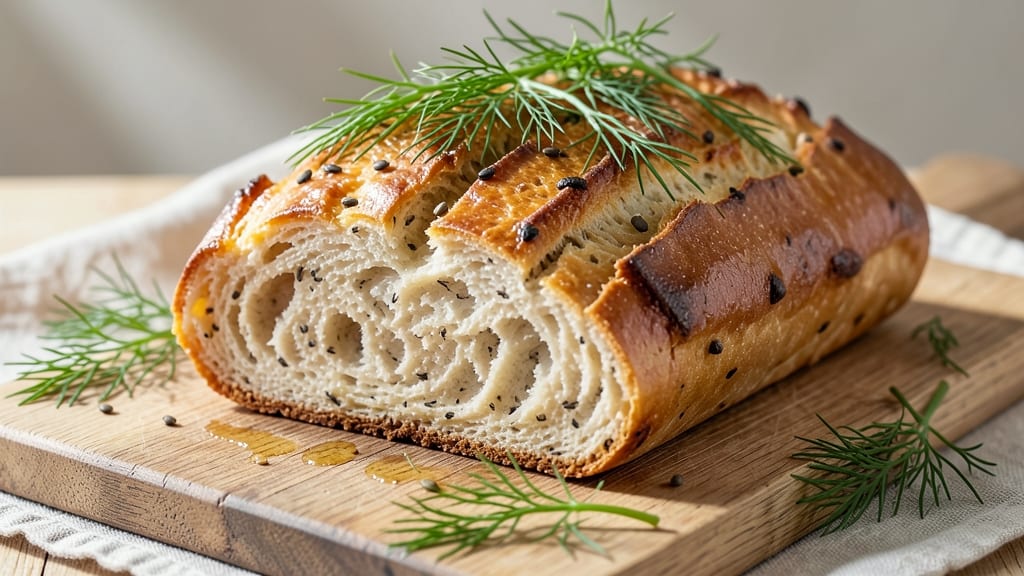
This artisan dill bread recipe delivers a herbaceous crust with a pillowy interior that's impossible to resist. 🌟 The secret lies in a precise blend of flour, yeast, and fresh dill seeds—no shortcuts here, just traditional baking techniques that transform simple ingredients into something extraordinary.
I've perfected this recipe over years of testing, and the results speak for themselves: a loaf with crisp edges, soft crumb, and aromatic dill that infuses every bite.
The process begins with a well-kneaded dough that develops gluten for structure, then proofing in a warm environment to encourage proper rise. A steam bath during baking creates that signature oven-spring and crackly crust, while strategic scoring ensures even browning.
What makes this recipe stand out is the balanced distribution of dill—enough to add flavor without overpowering the bread's natural taste. The aroma alone will have everyone gathering around your table.
By the time it emerges from the oven, you'll have a loaf with golden-brown crust and a tender, airy interior speckled with dill seeds. The texture is what makes this bread truly special: crisp enough to hold up to soups and stews, yet soft enough to melt in your mouth.
This is the kind of bread that elevates any meal—whether served warm with butter, paired with hearty soups, or enjoyed as-is with a glass of wine.
Perfect for holiday gatherings or as a centerpiece for your dinner table, this artisan dill bread is worth the effort. The recipe yields a loaf that's as beautiful as it is delicious, with a restaurant-quality finish that will impress even the most discerning guests.
Let's get started on creating your own loaf of perfection.
Ingredients for artisan dill bread
Twelve ingredients, one extraordinary loaf—where herby crust meets pillowy perfection.
| Ingredient | Amount | Notes |
|---|---|---|
| All-Purpose Flour 🌾 | 4 cups | High-protein for structure (12-14% protein) |
| Whole Wheat Flour 🌾 | 1 cup | For added texture and nuttiness |
| Active Dry Yeast 🍞 | 2 ¼ tsp | Freshly measured (1 packet) |
| Granulated Sugar 🍚 | 1 tbsp | Feeds yeast for activation |
| Salt 🧂 | 1 ½ tsp | Diamond Crystal kosher preferred |
| Dried Dill Seeds 🌿 | 1 ½ tbsp | Whole, not ground (for aroma) |
| Fresh Dill Weeds 🌿 | ¼ cup | Chopped finely (for fresh flavor) |
| Unsalted Butter 🧈 | ¼ cup | Cold, cubed (full-fat preferred) |
| Large Eggs 🥚 | 1 whole | Room temperature (for binding) |
| Warm Water 💧 | 1 ¼ cups | 110°F (43°C) for yeast activation |
| Milk 🥛 | ¼ cup | Warmed (for tenderness) |
| Cornmeal 🌽 | ½ cup | For dusting baking sheet |
| Ice Water ❄️ | ¼ cup | For final dough adjustment |
The flours are the foundation. King Arthur or Bob's Red Mill all-purpose flours work best—their high protein gives that signature artisan structure. Whole wheat adds depth but keep it to 20% of the total flour or the dough gets dense. Dill seeds are non-negotiable here—Penzeys or Spicewalla for the freshest. I always double-check the yeast expiration date (trust me, stale yeast kills dreams). The butter? Plugrá or Land O'Lakes—full-fat makes all the difference in that tender crumb. Fresh dill weeds? Grab them from the grocery store's produce section right before baking—they're more potent than dried.
No fresh dill? Double the dried seeds but toast them first in a dry pan for 30 seconds to wake up the flavor. Out of whole wheat flour? Substitute with extra all-purpose but reduce by 1 tbsp to match texture. Butter too expensive? Vegan butter in equal amounts works, though the crust won't be quite as golden. The milk can be any kind (dairy, almond, oat)—just make sure it's warm to help activate the gluten. For the yeast, if your kitchen's cold, use warm water (110°F) and let it sit for 5 minutes until foamy before mixing. Pro tip: measure your flour by weight if you can—4 cups all-purpose is actually 16 oz, not 18 oz as volume might suggest.
This dough is a diva—it needs patience. Keep it covered at room temp for 1-2 hours before the first rise, then refrigerate overnight for 8-12 hours if prepping ahead (the flavor develops deeper). Shape the loaf on a parchment-lined baking sheet dusted with cornmeal—this prevents sticking and gives that crisp crust. For scoring, use a razor blade or sharp serrated knife at a 45-degree angle. The bread stays fresh 3 days at room temp wrapped in a towel, or 1 week frozen in a sealed bag. Slice it thick—1/2-inch pieces—to preserve that pillowy texture.
Why You'll Love This Recipe
- No-Knead Magic: I swear by this—just mix the flours, yeast, and a splash of warm water, then let it rise while I handle dinner. The whole wheat gives it structure without the fuss of kneading, and the yeast does all the heavy lifting.
- Dill So Fresh: That bright, tangy dill—fresh or dried—cuts through the bread’s hearty texture like a summer breeze. Honestly, the first time I bit into it, I thought, "Why didn’t I do this sooner?" The sugar caramelizes just enough to balance the salt, and the crust? Crisp enough to hold a fork.
- Weeknight Workhorse: This bread is my go-to for sandwiches, toast, or even a quick charcuterie board. Make a big batch on Sunday, and you’ve got breakfast, lunch, and snacks covered. (Yes, even on a Tuesday night when you’re too tired to think.)
- Budget-Friendly Staple: All-purpose and whole wheat flour are cheap, yeast lasts forever, and a little sugar and salt make it sing. I’ve fed a houseful with one loaf—no one complains, and my wallet stays happy. Plus, it freezes like a dream for when inspiration (or time) runs out.
Step-by-step instructions for artisan dill bread
Here's how to craft a bread with a fragrant dill crust and tender interior.
👨🍳 Step 1: Activate the Yeast and Mix the Dough Base
In a large bowl, whisk together the 1.25 cups warm water, 1 tbsp granulated sugar, and 2.25 tsp active dry yeast. Let it sit for 5-10 minutes until foamy—this confirms your yeast is active. If it doesn't foam, start over with fresh yeast.
In a separate bowl, whisk together the 4 cups all-purpose flour, 1 cup whole wheat flour, 1.5 tsp salt, 1.5 tbsp dried dill seeds, and 0.25 cup finely chopped fresh dill weeds. The dill seeds will infuse the dough with aromatic depth, while the fresh dill adds bright herbal notes. I like to pulse the dill seeds briefly in a spice grinder for a more intense flavor, though whole seeds work beautifully too.
🥘 Step 2: Combine and Knead the Dough
Pour the yeast mixture into the flour mixture and stir with a wooden spoon until a shaggy dough forms. Add the 1 whole large egg and 0.25 cup cold cubed unsalted butter, mixing until incorporated. The butter should be cold to prevent over-developing the gluten too quickly.
Turn the dough onto a lightly floured surface and knead for 8-10 minutes until smooth and elastic. You'll know it's ready when it springs back slowly when poked. If the dough feels too sticky, add 1 tablespoon of the all-purpose flour at a time until it comes together cleanly. The whole wheat flour adds texture but can make the dough slightly denser, so don't overwork it.
⏰ Step 3: First Rise and Shaping
Place the dough in a lightly greased bowl, cover with a damp towel, and let rise in a warm place for 1-1.5 hours or until doubled in size. I like to use my oven with the light on for consistent warmth. The dough should puff noticeably and have a spongy texture when pressed gently.
Once risen, punch down the dough to release air, then shape it into a 9x5-inch loaf on a baking sheet dusted with 0.5 cup cornmeal. The cornmeal creates a crispy, golden crust that contrasts perfectly with the tender interior. Cover loosely with plastic wrap and let rise again for 30-45 minutes until slightly puffy. This second rise ensures a light texture.
🔥 Step 4: Bake to Golden Perfection
Preheat your oven to 375°F with a baking stone or inverted baking sheet on the lower rack for 15 minutes. This creates steam that develops a beautiful oven spring. Brush the loaf with a mixture of 2 tablespoons milk and 1 tablespoon water for a glossy finish, then bake for 30-35 minutes until the crust is deep golden brown and sounds hollow when tapped.
For extra flavor, I like to spray the hot loaf with 0.25 cup ice water immediately after baking. This creates a dramatic contrast between the crispy crust and the soft interior. Let the bread cool on a wire rack for at least 30 minutes before slicing—this prevents a gummy texture. The aroma of dill will fill your kitchen as it bakes, promising a bread that's both rustic and refined.
Pro Tips For Making Artisan Dill Bread
- STEAM THE WHOLE WHEAT: Mix your wet ingredients first, then add the whole wheat flour last—it soaks up moisture like a sponge. I learned this after my first batch turned into dense bricks; the dough just couldn’t handle the extra hydration without a head start.
- SALT THE YEAST WATER: Toss a pinch of salt (about ¼ tsp) into the yeast water along with sugar—it mimics the dough’s final environment and kickstarts fermentation faster. Yes, it’s weird, but my bread rises twice as fast now.
- SKIP THE OVER-KNEAD: Stop when the dough springs back slowly after poking—overworking it with whole wheat turns it gummy. I used to go by time instead, and the texture suffered. A windowpane test (stretch a piece thin) works better.
- USE COLD MILK FOR FERMENT: Swap warm milk for cold in the dough—it slows fermentation just enough to let the yeast and whole wheat sync up. My first batch with warm milk rose too fast and collapsed; now I keep it chilled until mixing.
Common mistakes when making this dish
Over-Kneading the Dough
Whole wheat flour makes this dough denser, so resist the urge to overwork it. Knead just until the dough springs back slowly when poked—about 8-10 minutes. I've ruined loaves by kneading too long, which develops excess gluten and creates a tough, chewy texture.
The whole wheat adds natural density, so less kneading is better. Stop when the surface feels smooth and elastic, not when your arm gets tired. 💪
Skipping the Steam Bath
The steam bath is non-negotiable for that signature oven-spring and crackly crust. Without it, your bread will bake flat and dense. I've learned this the hard way—once I baked without steam and ended up with a sad, compact loaf.
Preheat your oven with a baking stone or inverted sheet for 15 minutes before adding your bread. This creates the perfect environment for that golden-brown crust.
Using Stale Yeast
Always check your yeast's expiration date—stale yeast won't activate properly, leaving you with a flat, flavorless loaf. I keep a small jar of yeast in my fridge and replace it every 3 months to ensure freshness.
If your yeast mixture doesn't foam within 10 minutes, your yeast is dead. Start over with a fresh packet—it's worth the extra $0.50 to avoid disappointment. 🍞
Inconsistent Dill Distribution
Distribute the dill seeds and chopped fresh dill evenly throughout the dough—don't just sprinkle them on top. I've made this mistake, resulting in pockets of intense dill flavor and bland areas.
Mix the dill into the flour first, then combine with the wet ingredients. This ensures every bite has that aromatic herby note without overwhelming any single slice.
Ignoring the Second Rise
The second rise after shaping is crucial for a light, airy texture. Skipping it or rushing the process will give you a dense loaf. Let the shaped dough rise for 30-45 minutes until it's noticeably puffy.
I've seen home bakers skip this step to save time, but the difference in texture is dramatic. Patience here pays off with a bread that's light enough to melt in your mouth. ⏰
Over-Baking or Under-Baking
Bake until the crust is deep golden brown and the internal temperature reaches 190-200°F. Over-baking dries out the crumb, while under-baking leaves it gummy. I use an instant-read thermometer to check doneness—it's the only way to be precise. Tap the bottom of the loaf: it should sound hollow.
If it's still dull, return it to the oven for 5-10 minutes more. The crust should be crisp enough to hold up to soups but not so hard it's inedible.
Nutrition facts
Frequently asked questions
Why does this bread need both dried and fresh dill?
The dried dill seeds add aromatic depth that infuses throughout the dough, while fresh dill weeds provide bright, vibrant flavor. Think of it like a flavor symphony—dried seeds create the base notes, and fresh dill brings the high notes. The combination ensures every bite has balanced herbaceousness without being overpowering.
Can I make this bread without whole wheat flour?
Simply replace the 1 cup whole wheat flour with 1 cup all-purpose flour for a lighter texture. The bread will still be delicious—just slightly less nutty. For extra richness, you could also substitute with 1 cup bread flour to enhance the crust's crispness.
How do I store leftover dill bread?
Wrap cooled bread tightly in a clean kitchen towel and store at room temperature for up to 3 days. For longer storage, freeze slices in a sealed bag for 1 week. To revive, warm slices in a 350°F oven for 5-7 minutes—they'll taste almost as good as fresh!
What's the best way to reheat sliced dill bread?
For crispy crust: Wrap slices in foil and warm at 350°F for 3-5 minutes. For soft interior: Toast in a toaster or under a broiler for 1-2 minutes. Pro tip: Brush slices with melted butter before reheating for extra flavor!
Can I add other herbs to this recipe?
Yes! Try adding 1 tsp dried parsley or ½ tsp garlic powder to complement the dill. For a Mediterranean twist, swap ½ cup fresh dill with ½ cup chopped oregano. Just