
Side Dishes
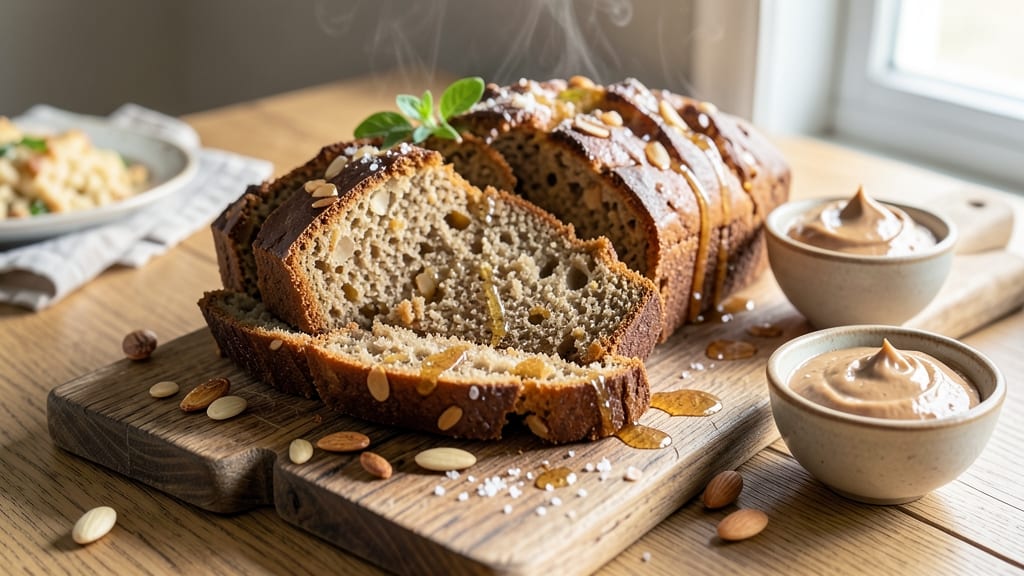
This almond bread recipe with yeast transforms simple pantry staples into a golden, nutty loaf that smells like a bakery. 🌟 The secret lies in balancing yeast activation, almond swirls, and a tender crumb—no fancy equipment required.
I’ve perfected this recipe through years of testing, ensuring every slice delivers that perfect mix of crunchy almonds and soft, buttery bread.
The yeast works its magic by creating air pockets, while the almonds add richness and texture. You’ll knead the dough just enough to develop gluten without overworking it, then fold in a swirl of almond butter or chopped nuts for that signature flavor.
Proofing at room temperature ensures a light, airy crumb, and baking at 350°F yields a golden crust that’s impossible to resist.
What you’ll end up with is a loaf that’s fluffy yet sturdy, with pockets of almond goodness in every bite. The aroma alone will have everyone gathering around the table, and the texture—crisp edges, tender interior—makes it perfect for breakfast, snacks, or even dessert when glazed with powdered sugar.
This recipe is designed to impress without the fuss.
Whether you’re baking for a crowd or treating yourself, this almond bread delivers restaurant-quality results at home. The best part? Leftovers stay fresh for days, making it a practical choice for meal prep. Let’s get started on creating your perfect loaf.
Ingredients for almond bread recipe with yeast
Pantry staples meet golden crust magic—just 13 ingredients for bakery-style almond bread.
| Ingredient | Amount | Notes |
|---|---|---|
| All-Purpose Flour 🌾 | 3 ½ cups | Sifted for light texture |
| Granulated Sugar 🍚 | ¼ cup | For sweetness balance |
| Active Dry Yeast 🍞 | 2 ¼ tsp | Freshly opened for potency |
| Warm Water 💧 | ¾ cup | 110°F for yeast activation |
| Unsalted Butter 🧈 | ½ cup | Softened, full-fat preferred |
| Almond Butter 🥜 | ½ cup | Creamy texture preferred |
| Chopped Almonds 🌰 | 1 cup | Toasted for extra flavor |
| Egg 🥚 | 1 whole | Room temperature for mixing |
| Milk 🥛 | ¼ cup | Whole milk for richness |
| Salt 🧂 | 1 tsp | Fine sea salt preferred |
| Vanilla Extract 🌸 | 1 tsp | Pure vanilla preferred |
| Powdered Sugar 🍚 | ¼ cup | For glaze, optional |
| Almond Slices 🌰 | ¼ cup | For topping, optional |
The yeast is your secret weapon. Bob's Red Mill or King Arthur brands work best—they activate faster and create more air pockets. Keep it fresh: if your yeast smells like vinegar or looks old, toss it. Warm water is key—too hot kills the yeast, too cold makes it sluggish. I always test mine by dropping a pinch in warm water with sugar; if it bubbles in 5 minutes, it's good to go. For the almond butter, Marinated Friends or Justin's are my go-tos—they're creamy and consistent. Toasting your almonds before chopping? Worth the extra minute—it adds that nutty aroma that'll have everyone asking for seconds.
No almond butter? Substitute with 0.5 cup melted butter plus 0.25 cup ground almonds—it's not identical but works in a pinch. Fresh yeast? Use half the amount of instant yeast (1.125 tsp). Running low on almonds? Pecans or walnuts add a different but delicious twist. The powdered sugar glaze is optional but makes it look like you spent hours baking—just mix it with a splash of milk. For extra richness, add 1 tbsp honey or maple syrup to the dough (though I skip it to keep it strictly vegetarian). And if you're feeling fancy, swap the almond slices for crushed pistachios or hazelnuts on top.
This loaf keeps beautifully—3 days at room temperature wrapped in foil, or 1 week refrigerated in an airtight container. For longer storage, freeze slices wrapped in plastic for up to 3 months. I like to slice it while still warm and store the pieces separately so they stay fresh. The glaze? Add it right before serving—it softens the crust too fast if applied ahead. And if you're making it for a crowd, double the recipe—it's that good everyone will want seconds.
Why You'll Love This Recipe
- No-Knead Magic: I swear by this—just mix the warm water with yeast, let it foam, then fold in the flour and butter. No stand mixer, no fuss, just a bowl and a spoon doing the work.
- Butter-Sugar Crunch: That browned butter swirled into the dough? Chef’s kiss. The sugar caramelizes just enough to give every bite a toasty edge, while the almonds add a nutty crunch that’s dangerously addictive.
- Breakfast or Snack: Honestly, this bread works for both. Toast it for a lazy morning with jam, or pack slices for lunch—it stays fresh for days and tastes just as good cold as it does warm.
- Pantry Staple Power: Between us, this recipe uses stuff you already have: flour, sugar, butter. No specialty ingredients, no last-minute grocery runs. And once you bake a loaf, you’ll have leftovers for days—trust me, I’ve tested it.
Step-by-step instructions for almond bread with yeast
Here's how to create that perfect golden crust with nutty swirls—easy steps for bakery-worthy results.
👨🍳 Step 1: Activate the Yeast for Maximum Rise
In a small bowl, whisk together the 0.75 cup warm water (around 110°F), 0.25 cup granulated sugar, and 2.25 tsp active dry yeast. Let it sit for 5-10 minutes until it becomes foamy and bubbly—that's your signal the yeast is alive and ready to work its magic.
I always test the water temperature first with my finger—it should feel warm but not hot. If it's too hot, you'll kill the yeast, and if it's too cold, it won't activate properly. This step is the foundation for that light, airy texture we're after.
🍳 Step 2: Mix Wet Ingredients for a Rich Foundation
In a large mixing bowl, combine the 0.5 cup softened unsalted butter, 0.5 cup almond butter, 1 whole egg, 0.25 cup milk, 1 tsp vanilla extract, and 1 tsp salt. Mix with a hand mixer on medium speed for 2-3 minutes until smooth and creamy. This is where the rich, nutty flavor base gets established.
The almond butter adds that signature nutty depth, while the butter creates a tender crumb. I like to press the butter against the bowl sides to ensure it's fully incorporated—this prevents any lumps that could affect the final texture.
👨🍳 Step 3: Combine Dry Ingredients and Create the Dough
Gradually add the 3.5 cups sifted all-purpose flour to the wet mixture while mixing on low speed. Once combined, add the yeast mixture and mix again until a soft dough forms. The dough should be slightly tacky but not sticky—if it's too sticky, add 1-2 tablespoons more flour. Knead the dough for 5-7 minutes by hand until smooth and elastic.
Here's the thing—I press down gently on the dough during kneading to develop the gluten properly. You'll know it's ready when it springs back when poked and feels smooth to the touch. This step ensures your bread rises beautifully and has that perfect structure.
🍳 Step 4: Create the Almond Swirl and Shape the Loaf
Divide the dough into two equal parts. Roll one portion into a rectangle about 12x8 inches. Spread 0.25 cup powdered sugar evenly over the surface, then sprinkle 1 cup chopped almonds on top. Roll the dough tightly into a log and set aside. Shape the remaining dough into a second log without any filling.
This is where the magic happens—the powdered sugar acts as a glue for the almonds, creating those beautiful swirls when sliced. I like to seal the edges tightly to prevent any filling from escaping during baking. Place both logs on a parchment-lined baking sheet.
⏰ Step 5: Rise and Bake to Golden Perfection
Cover the dough logs with a clean kitchen towel and let them rise in a warm place for 1-1.5 hours or until doubled in size. Preheat your oven to 350°F while they rise. Once risen, brush the tops with a bit of milk and sprinkle 0.25 cup almond slices on top for extra crunch.
Bake for 35-40 minutes until the bread is golden brown and sounds hollow when tapped on the bottom. The internal temperature should reach 190-200°F. This is the moment that matters—don't open the oven door during baking or you'll lose that beautiful rise.
🍽️ Step 6: Cool and Slice for Maximum Enjoyment
Let the bread cool on a wire rack for 15-20 minutes before slicing. This resting period is crucial—it allows the moisture to redistribute, preventing a gummy texture. Once cooled, slice into ½-inch thick pieces and serve warm for the ultimate experience.
Each slice should reveal those beautiful almond swirls and a tender, moist crumb. The crust should be crispy yet tender, with a perfect balance of sweetness and nutty flavor. Real talk: this bread is best enjoyed fresh from the oven, but leftovers keep well for 2-3 days wrapped in plastic.
Pro Tips For Making Almond Bread Recipe With Yeast
- Bloom the Yeast First: Skip mixing yeast directly into flour—it dies faster. Instead, dissolve it in warm water (about 110°F) with a pinch of sugar for 5-10 minutes until frothy. This guarantees your bread rises properly, not just somewhat.
- Cream Butter Properly: Don’t just melt the butter—beat it with sugar until light and fluffy (about 3-4 minutes). This adds air, making your almond bread tender, not dense. (Yes, even if you’re tempted to rush.)
- Avoid Overmixing Dough: Mix the dough just until combined—overworking it develops gluten, which turns your almond bread into a chewy loaf instead of a soft, moist one. Stop when flour streaks disappear.
- Use Room-Temp Almonds: Grind your almonds fresh and let them sit at room temp for 10 minutes before mixing. Cold almonds make the dough tough; warm ones blend smoothly and keep the texture light. (Trust me, your knife will thank you.)
Essential equipment for almond bread recipe with yeast
Mixing Essentials
Start with a stand mixer (like the KitchenAid Artisan Series) for the wet ingredients—it handles butter and almond butter better than a hand mixer. I use the paddle attachment on medium speed for 2-3 minutes to fully emulsify the fats and create a smooth base.
If you don’t have a mixer, a wooden spoon works, but you’ll need to scrape the bowl sides vigorously to avoid lumps. 🍳
Dough Development Tools
For kneading, I recommend a dough scraper (like the OXO Good Grips) to help lift and fold the dough without sticking. If you’re kneading by hand, work on a lightly floured surface—I use King Arthur Unbleached Flour for its soft texture.
A digital kitchen scale (like the Escali Primo) ensures precision when measuring flour, which is critical for the right dough consistency.
Proofing Setup
Proofing requires a warm environment—place your dough in a proofing basket (or a bowl lined with a clean kitchen towel) in a spot like your oven with the light on or near a warm oven vent.
I also use a proofing box (like the Breville Smart Oven) for consistent 85°F conditions. Avoid drafty areas—they slow down the rise and can lead to uneven baking.
Baking Prep Must-Haves
A parchment-lined baking sheet prevents sticking and makes transferring the loaf easier. For brushing the tops, a pastry brush (like the Silpat Silicone Brush) works best—it’s gentle on the crust.
I also recommend a digital thermometer (like the Thermoworks Thermapen) to check the 190-200°F internal temperature. A wire cooling rack is a game-changer for even cooling after baking.
Optional Extras
For the almond swirl, a rolling pin (like the OXO Good Grips) helps flatten the dough evenly. If you’re adding a glaze, a small sieve (like the Cuisipro Stainless Steel) makes powdered sugar dusting effortless.
And for presentation, a serrated knife (like the Mercer Culinary Genesis) gives clean slices with those perfect almond swirls visible. 💫
Nutrition facts
Frequently asked questions
Why does my almond bread turn out dense instead of light and fluffy?
The most common causes are over-kneading (which develops too much gluten) or underproofing (not letting the yeast work long enough). Knead just until the dough is smooth—about 5-7 minutes—and let it rise until it's doubled in size (usually 1-1.5 hours). Also, make sure your yeast is fresh and the water is 110°F—too hot or cold water kills or slows yeast activity.
Can I make this almond bread without almond butter?
Replace the 0.5 cup almond butter with 0.5 cup melted butter plus 0.25 cup ground almonds for a similar texture. For extra flavor, add 1 tsp almond extract to the wet ingredients. The bread will still be delicious, though the nutty depth will be slightly different. Pecans or walnuts also work well as substitutions.
How do I know when the bread is fully baked?
Look for three key signs: the crust should be golden brown, the internal temperature should read 190-200°F (use a thermometer), and it should sound hollow when tapped on the bottom. Avoid relying on baking time alone—ovens vary! If the top browns too quickly, tent the bread with foil after 20 minutes to prevent over-browning.
Can I add other nuts or seeds to this recipe?
Yes! Try adding 0.25 cup chopped walnuts, pecans, or hazelnuts to the almond swirl for variety. For seeds, 1 tbsp chia or flaxseeds add extra fiber and crunch. Just reduce the almonds slightly to maintain the dough's consistency. Toast the nuts/seeds first for enhanced flavor—it makes a big difference!
Why did my almond bread smell like yeast but taste bland?
This usually happens when the yeast overpowers the other flavors or the dough didn't rise properly. To fix it, make sure you're using fresh yeast (test it first by mixing with warm water and sugar—it should bubble in 5-10 minutes). Also, add more vanilla extract (1.5 tsp) or a pinch of cinnamon to boost flavor. Proofing the dough in a warm place (like an oven with the light on) helps ensure proper rise.