
Side Dishes
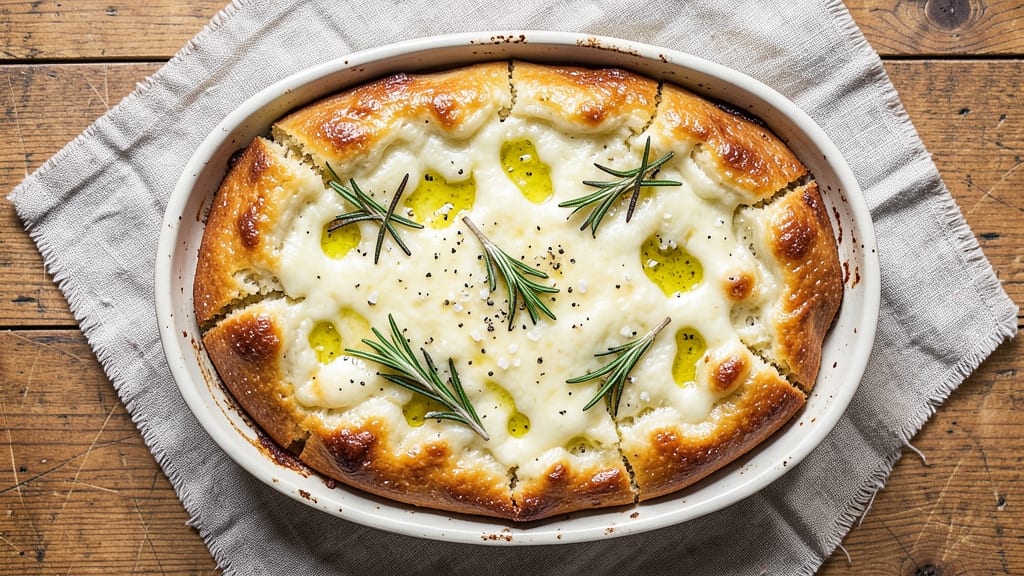
This Asiago cheese focaccia bread recipe transforms simple ingredients into a golden, cheesy masterpiece with irresistible pull-apart texture. The key lies in a perfectly balanced dough—yeast-activated, olive oil-rich, and studded with Asiago cheese that melts into gooey strings during baking.
I've refined this recipe over years, ensuring every bite delivers that crispy crust and tender crumb combination that makes focaccia unforgettable.
The process begins with a foolproof dough that requires just 10 minutes of prep work, followed by a 30-minute rise that develops deep flavor. Asiago cheese, with its nutty, slightly sweet profile, becomes the star when baked until the crust turns golden and the cheese stretches into perfect, cheesy strands.
Traditional Italian techniques like dimpling the dough with fingers create those signature air pockets that make focaccia so satisfying.
By the time it emerges from the oven, you'll have a restaurant-quality loaf with a crisp exterior and soft, cheesy interior. The aroma alone will have everyone gathering around your table—this focaccia is perfect for appetizers, sandwiches, or simply enjoyed warm with olive oil and balsamic vinegar.
The beauty of this recipe is its versatility; you can customize it with rosemary, garlic, or extra herbs to suit your taste.
Whether you're hosting a dinner party or craving a comforting homemade treat, this focaccia delivers golden perfection every time. The secret is patience—letting the dough rise fully and baking it until the cheese is fully melted ensures that foolproof result. Let's get started on creating your cheesiest, crispiest focaccia yet!
Ingredients for asiago cheese focaccia bread
Golden crust meets melty Asiago cheese strings—just 11 ingredients transform your kitchen into an Italian bakery.
| Ingredient | Amount | Notes |
|---|---|---|
| Active Dry Yeast 🍞 | ¼ tsp | Ensure it's fresh (test in warm water) |
| Granulated Sugar 🍬 | 1 tbsp | Activates yeast quickly |
| Extra-Virgin Olive Oil 🫒 | ¾ cup | High-quality, fruity variety |
| Warm Water 💧 | 1 cup | 110°F for yeast activation |
| All-Purpose Flour 🌾 | 3 ½ cups | King Arthur or similar |
| Diamond Crystal Kosher Salt 🧂 | 1 ½ tsp | Fine grain preferred |
| Shredded Asiago Cheese 🧀 | 1 ½ cups | Freshly grated from block |
| Fresh Rosemary 🌿 | 2 tbsp | Chopped, stems removed |
| Garlic Cloves 🧄 | 3 cloves | Minced for flavor infusion |
| Cornmeal 🌽 | ¼ cup | For dusting baking sheet |
| Flaky Sea Salt 🧂 | 1 tbsp | For final sprinkle |
The Asiago cheese is non-negotiable here—block cheese from specialty shops melts into those perfect strings. Whole Foods or local gourmet markets carry the best quality, but any high-end grocery store's deli section will work. Freshly grated is essential; pre-shredded contains anti-caking agents that prevent proper melting. For the olive oil, California Avocado or Colavita brands deliver that fruity depth. Rosemary should be fragrant and green—avoid wilted sprigs. The yeast? Check the expiration date—if it's been sitting in your pantry for months, grab a new packet. This dough is all about balance: enough yeast for lift, enough olive oil for richness, and that nutty Asiago to tie it all together.
No Asiago? Parmigiano-Reggiano or Gruyère work in a pinch, though the flavor profile shifts slightly. Running out of fresh rosemary? Dried rosemary at one-third the amount gets you close, but fresh is ideal. No cornmeal? Semolina or crushed crackers create a similar texture on the baking sheet. The garlic can be roasted for a sweeter note—just toss whole cloves with olive oil and bake at 400°F for 10 minutes before mincing. For a gluten-free version, swap the all-purpose flour for a 1:1 gluten-free blend, but expect a denser texture. And if you're short on time, instant yeast works at half the amount with no proofing step—though the flavor won't be quite as developed.
This dough is a patient's game—let it rise until it's just over doubled, about 30 minutes at room temperature. For best results, shape the focaccia on a parchment-lined baking sheet to avoid sticking. The cheese will stretch dramatically as it bakes, so don't overcrowd the pan. Store leftovers wrapped at room temperature for 2 days or freeze for 3 months. To reheat, wrap in foil and warm at 350°F for 10 minutes. Pro tip: Brush warm focaccia with extra-virgin olive oil and sprinkle with flaky salt right before serving—it's like eating liquid gold.
Why You'll Love This Recipe
- No-Knead Magic: I swear by the simplicity of this dough—just mix, wait, and shape. No stand mixer, no fancy techniques, just a bowl and 10 minutes of hands-on time before letting the yeast do all the work.
- Melty Heaven: That first pull-apart bite? Pure satisfaction—crispy, airy pockets with asiago stretching like silk. Honestly, the moment the cheese starts bubbling under the broiler, I forget to breathe.
- Weeknight Swiss Army Knife: Breakfast? Check. Sandwiches? Done. Charcuterie board? Perfect. It’s my go-to for lazy mornings or impromptu gatherings, and the leftovers actually taste better the next day.
- Budget-Friendly Luxury: A block of asiago and a bottle of EVOO make this feel fancy without the price tag. I’ve made this for $8 a loaf—way cheaper than store-bought, and way tastier. (Yes, even on a Tuesday night.)
Step-by-step instructions for Asiago cheese focaccia bread
Here's how to create a focaccia with irresistible melty cheese strings and a crispy golden crust.
Activate the Yeast for Fluffy Texture
In a small bowl, combine the 0.25 tsp active dry yeast and 1 tbsp granulated sugar with the 1 cup warm water (tested at 110°F). Let it sit for 5-7 minutes until frothy—this confirms your yeast is alive and ready to work. If nothing happens after 10 minutes, your yeast is likely dead and you'll need to start over.
This activation step is crucial because it kickstarts the fermentation process, ensuring your focaccia rises properly. The sugar feeds the yeast, creating those tiny bubbles that give focaccia its signature airy texture. Stir gently once to distribute the yeast evenly, then let it sit undisturbed until fully bubbly.
Mix Dough and Incorporate Cheese
In a large bowl, whisk together the 3.5 cups all-purpose flour and 1.5 tsp diamond crystal kosher salt. Create a well in the center and pour in the yeast mixture along with the 0.75 cup extra-virgin olive oil. Using a wooden spoon, gradually incorporate the flour from the edges until a shaggy dough forms.
Once the dough comes together, fold in the 1.5 cups shredded asiago cheese, 2 tbsp fresh rosemary, and 3 minced garlic cloves. The cheese will begin to melt slightly from the warmth of the dough—this is normal and actually helps distribute flavor throughout. Turn the dough onto a lightly floured surface and knead gently for 2-3 minutes just until smooth. Over-kneading develops gluten, which can make the focaccia tough.
First Rise and Shape the Dough
Lightly oil a large bowl, place the dough inside, and cover with a damp towel. Let it rise in a warm place for 1-1.5 hours or until doubled in size. You'll know it's ready when the dough springs back slowly when poked gently with a finger—this indicates proper fermentation.
After rising, transfer the dough to a 9x13-inch baking pan that's been lightly greased with olive oil. Press the dough gently with oiled hands to stretch it to fit the pan, creating dimples with your fingertips. This dimpling creates those beautiful pockets where the cheese will melt into strings during baking. Sprinkle the 0.25 cup cornmeal evenly over the dough to prevent sticking.
Second Rise and Prepare for Baking
Cover the pan with a damp towel and let the dough rise again for 30-45 minutes until it's puffy and nearly fills the pan. Preheat your oven to 425°F while the focaccia rises—this ensures it goes straight into a hot oven for maximum browning.
Once the oven is preheated, drizzle the focaccia generously with additional olive oil (about 2 tbsp) and sprinkle evenly with the 1 tbsp flaky sea salt. The salt will create those beautiful crusty edges while enhancing the cheese flavor. Let it sit for 5 minutes while you prepare the oven for baking—this gives the salt time to adhere properly.
Bake to Golden Perfection
Bake the focaccia for 20-25 minutes until the crust is deep golden brown and the cheese is bubbling with melted strings. You'll see the edges puff up and turn crispy while the center remains soft and pillowy. If the top browns too quickly, tent loosely with foil for the last 5 minutes of baking.
Remove from the oven and let cool for 10 minutes before slicing. The internal temperature should reach 190-200°F when checked with an instant-read thermometer. Serve warm with olive oil for dipping or alongside soups and salads. The cheese strings should be stretchy and gooey, while the crust remains crispy enough to hold up to tearing. Enjoy immediately while it's at its peak texture!
Pro Tips For Making Asiago Cheese Focaccia Bread
- Bloom the Yeast Properly: Mix the yeast, sugar, and warm water (about 110°F) first—let it sit for 5-10 minutes until it’s frothy and bubbly before adding flour. I learned this the hard way: skipping this step means your dough will rise slower, and the bread might end up dense. If it doesn’t bubble? Your yeast is dead, and starting over saves frustration later.
- Use Extra-Virgin Olive Oil: Don’t skimp on the oil—this isn’t just for flavor, it’s what makes focaccia tender and golden. Use the good stuff (extra-virgin) and generously drizzle it over the dough before baking, then sprinkle more after the first 10 minutes. Trust me, the difference in texture is worth the extra splurge.
- Don’t Overwork the Dough: Once you add flour, stop mixing as soon as it pulls away from the bowl. Over-kneading develops gluten too much, and your focaccia will turn out chewy instead of airy. A few minutes of stretching and folding is enough—this bread relies on its open crumb, not toughness.
- Press Cheese After First Rise: After the dough rises, press it into the pan, then dimple it with your fingers—but before baking, scatter the asiago evenly and press it lightly into the dough. This keeps it from sliding off during baking and ensures every bite has that melty, salty goodness. (Yes, even if it looks messy.)
Perfect pairings for this recipe
Olive Oil Drizzle
Finish your focaccia with a generous drizzle of extra-virgin olive oil right before baking—this creates that signature glossy crust. I recommend California Avocado brand for its fruity notes that complement the Asiago cheese.
Brush about 2 tablespoons evenly over the dough after shaping, focusing on the edges for maximum crispiness. 🫒
Balsamic Glaze
For a sweet-tart contrast, drizzle warm focaccia with aged balsamic glaze after baking. Use 1-2 tablespoons of Belgioioso brand for its rich, caramelized flavor. The acidity cuts through the richness of the cheese while adding visual appeal.
Let it cool slightly before drizzling to prevent the glaze from melting too quickly.
Herb-Infused Dips
Serve with homemade dips that elevate the flavors. A simple garlic-infused olive oil (mix ¼ cup olive oil with 2 minced garlic cloves and 1 tsp lemon zest) pairs perfectly.
For a creamy option, blend ½ cup ricotta cheese with 1 tbsp honey and 1 tbsp chopped fresh basil. The herby notes complement the Asiago beautifully.
Wine Pairings
Pair your focaccia with Italian wines that enhance its flavors. A crisp Pinot Grigio from Alto Adige balances the richness, while a medium-bodied Chianti complements the rosemary and garlic. For a lighter option, try a Prosecco—its bubbles cleanse the palate between bites.
Avoid heavy reds like Barolo, as they can overpower the delicate cheese and herb notes. 🍷
Cheese Board Pairings
Turn your focaccia into the star of a cheese board by pairing it with complementary cheeses. Add aged pecorino romano for a salty contrast, creamy burrata for richness, and spicy soppressata for a meaty bite. The Asiago in your focaccia will shine alongside these selections, creating a harmonious flavor experience.
Sweet Contrasts
Balance the savory flavors with sweet accompaniments. A drizzle of honey or a sprinkle of crushed pistachios adds texture and sweetness. For a more decadent touch, serve with dark chocolate-dipped strawberries. The contrast of sweet and salty makes every bite unforgettable. 🍓
Nutrition facts
Frequently asked questions
Can I substitute Asiago cheese with another type?
Yes, but the flavor will change. Parmigiano-Reggiano or Gruyère work well as alternatives, though they're saltier. For a milder taste, try fontina or combo cheese. Avoid pre-shredded cheeses—they contain anti-caking agents that prevent proper melting into those signature strings.
Why did my focaccia turn out dense instead of light and airy?
This usually happens from over-kneading or under-rising. The dough should only be kneaded for 2-3 minutes—overworking develops gluten, making it tough. Also ensure proper rising: the dough needs 1-1.5 hours to double in size at room temperature. If your kitchen is cold, place the bowl near a warm oven (turned off) to help it rise faster.
How do I make this focaccia gluten-free?
Replace the all-purpose flour with a 1:1 gluten-free flour blend (like Bob's Red Mill). You'll need to add 1 tsp xanthan gum to mimic gluten's structure. The texture will be denser, but still delicious. Also reduce the olive oil to 0.5 cup to prevent a greasy result. Let the dough rise 30-45 minutes longer as gluten-free dough rises slower.
Can I make this ahead of time?
Shape and rise the focaccia, then refrigerate the dough (unbaked) for up to 24 hours. Let it sit at room temperature for 1 hour before baking. For leftovers, store wrapped at room temperature for 2 days or freeze for 3 months. To reheat, wrap in foil and warm at 350°F for 10 minutes—it reheats beautifully.
What's the secret to perfect cheese strings?
The magic happens with freshly grated Asiago cheese (no pre-shredded!) and proper baking time. Use 1.5 cups of cheese and bake until the internal temperature reaches 190-200°F. The cheese needs to melt completely—if it's still cool in the center, bake 5 more minutes. For extra gooeyness, sprinkle cheese on top right before baking.