
Appetizers
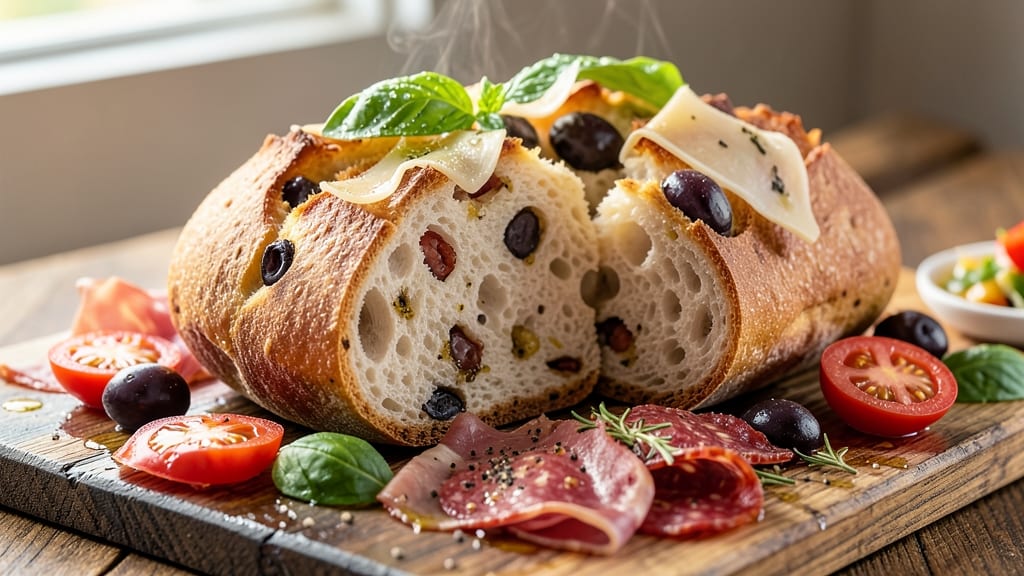
This antipasto bread recipe transforms a simple loaf into the star of any Italian spread, where every crispy bite carries the essence of the Mediterranean. 💛 The secret lies in a rich olive oil dough infused with fragrant herbs like rosemary and thyme, creating a rustic texture that pairs perfectly with cured meats, olives, and cheeses.
I developed this recipe after realizing how often antipasto platters needed a bread that could stand up to their bold flavors—this one delivers with its golden crust and tender crumb.
The process is straightforward but rewarding: knead a dough enriched with olive oil for a tender yet sturdy texture, let it rise until puffy, then bake until golden brown. The olive oil not only enhances flavor but also keeps the bread moist for days.
What makes this recipe special is its versatility—it works as an appetizer on its own or as the perfect companion to your favorite antipasto ingredients.
By the time you pull it from the oven, you’ll have a loaf with a crisp exterior and a soft, fragrant interior that’s impossible to resist. The aroma alone will draw everyone to the table, while the flavor—savory, herby, and slightly tangy—makes it a standout in Italian cuisine.
This bread is more than just a side; it’s the heart of your antipasto experience.
For an extra touch, brush the baked loaf with more olive oil and sprinkle with flaky sea salt or coarse black pepper. Serve warm with olive tapenade, prosciutto, or marinated vegetables for the ultimate Italian-inspired appetizer. Here’s how to make it perfectly every time.
Ingredients for antipasto bread
Olive oil, herbs, and yeast transform simple flour into Mediterranean magic for your antipasto spread.
| Ingredient | Amount | Notes |
|---|---|---|
| All-Purpose Flour 🌾 | 4 cups | Spooned and leveled for accuracy |
| Extra-Virgin Olive Oil 🫒 | ¾ cup | High-quality, fruity variety |
| Active Dry Yeast 🍞 | 2 ¼ tsp | Freshly opened for best results |
| Granulated Sugar 🍚 | 1 tbsp | For yeast activation |
| Warm Water 💧 | 1 ¼ cups | 110-115°F for yeast activation |
| Salt 🧂 | 1 ½ tsp | Diamond Crystal preferred |
| Fresh Rosemary 🌿 | 2 tbsp | Finely chopped, stems removed |
| Fresh Thyme Leaves 🌿 | 1 tbsp | Or 1 tsp dried thyme |
| Garlic Cloves 🧄 | 2 cloves | Minced for flavor infusion |
| Flaky Sea Salt 🧂 | 1 tbsp | For finishing the loaf |
| Coarse Black Pepper 🌶️ | ½ tsp | For garnish (optional) |
| Cornmeal 🌽 | ¼ cup | For dusting the baking sheet |
The olive oil is non-negotiable here—look for extra-virgin with a fruity aroma at Whole Foods or Trader Joe's. The fresh rosemary and thyme make all the difference; I grab mine from the grocery store's produce section and chop it right away (it keeps for 5 days in the fridge). For the yeast, don't use the old packet sitting in your pantry—buy a new one if you're unsure. The garlic adds depth, so smash the cloves lightly before mincing for maximum flavor. Cornmeal? It's a game-changer for crispy crust—don't skip it.
No fresh rosemary? Dried works at half the amount, but it won't have the same punch. Running low on thyme? Oregano or basil can substitute, though the flavor shifts slightly. Short on olive oil? Avocado oil is a decent swap, but it lacks that Mediterranean character. The sugar is just for yeast activation—skip it if you're strict vegan. For the salt, Diamond Crystal dissolves better than table salt, but any fine salt works. And if you're feeling fancy, toast the garlic cloves in the olive oil before mixing—trust me on this.
This dough needs time to rise—2-3 hours in a warm spot. I usually pop it in the oven with the light on for the first hour, then let it rise on the counter. The baked loaf keeps well for 3 days wrapped in a clean kitchen towel, but it reheats beautifully too. For extra crispiness, brush with more olive oil right after baking. Store any leftovers in an airtight container, but honestly, it won't last that long—this bread disappears fast at parties.
Why You'll Love This Recipe
- No-Knead Nightmare Over: This dough comes together faster than my coffee brews—just mix, let it rise, and you’re done. No standing at the counter, no sticky hands, no fuss. Honestly, I used to dread bread night, but this? It’s my new favorite lazy evening.
- Olive Oil Magic: That first pull-apart bite? Rich, buttery, and just crispy thanks to the olive oil. The yeast and sugar work together to give it a light, airy crumb, but it’s the olive oil that makes it taste like you slaved away for hours. (Between us, I’ve tried cutting corners—don’t.)
- Party in a Loaf: Slice it thick for bruschetta, tear it for charcuterie, or just eat it straight with a smear of garlic butter. It’s the ultimate crowd-pleaser—whether you’re feeding a family or impressing guests. I’ve even wrapped it in foil and reheated slices for breakfast the next day. (Yes, even on a Tuesday night.)
- Pantry Staple Power: Five ingredients, zero specialty items. If you’ve got flour, yeast, and olive oil, you’re golden. And because it keeps well wrapped at room temp, I always have a backup when I forget to buy bread. Budget-friendly? Absolutely. Life-saver? Even more so.
Step-by-step instructions for antipasto bread
This savory olive oil bread delivers bold Mediterranean flavors with every bite.
👨🍳 Step 1: Activate the Yeast and Mix the Dough
In a small bowl, combine the 1.25 cups warm water, 1 tbsp granulated sugar, and 2.25 tsp active dry yeast. Let it sit for 5-10 minutes until frothy—this confirms your yeast is alive. If it doesn't bubble, start over with fresh yeast.
In a large mixing bowl, whisk together the 4 cups all-purpose flour and 1.5 tsp salt. Make a well in the center and pour in the yeast mixture along with the 0.75 cup extra-virgin olive oil. Using a wooden spoon, stir until a shaggy dough forms. Here's the thing—don't worry if it looks messy at first.
Transfer the dough to a lightly floured surface and knead for 8-10 minutes until smooth and elastic. You'll know it's ready when it springs back slowly when poked. If it sticks, wet your hands slightly—this prevents tearing. I like to keep a bowl of flour nearby for quick cleanup, but don't over-flour or the dough will get tough.
🥘 Step 2: Incorporate Herbs and Garlic
Once the dough is smooth, press it into a flat disk and sprinkle evenly with the 2 tbsp finely chopped fresh rosemary, 1 tbsp fresh thyme leaves, and 2 cloves minced garlic. Gently fold these into the dough by pinching and stretching the edges toward the center.
The reason we add herbs now is to distribute their flavors evenly throughout the loaf. Don't skip this step—it makes all the difference in that aromatic, Mediterranean taste. If your herbs are particularly strong, you might want to use slightly less, but I find this amount gives perfect flavor without overpowering.
Shape the dough into a round loaf and place it back in your mixing bowl. Cover with a damp kitchen towel and let it rise in a warm place for 1-1.5 hours, or until it's nearly doubled in size. I usually put it near the oven with the light on—this creates a warm, humid environment that helps the dough rise beautifully.
🔥 Step 3: Shape and Proof the Loaf
Punch down the risen dough to release air, then shape it into a round loaf about 8 inches in diameter. Place it on a baking sheet dusted with 0.25 cup cornmeal—this prevents sticking and gives a nice crust texture. Cover again and let it proof for another 30-45 minutes until it's puffy and jiggly when gently shaken.
Here's where it gets fun—use a sharp knife to make a shallow cross on top of the loaf. This creates steam vents that help the bread expand beautifully in the oven. Sprinkle with the 1 tbsp flaky sea salt and 0.5 tsp coarse black pepper for that final antipasto touch. Don't skip the salt—it's what makes this bread truly special.
🔥 Step 4: Bake to Golden Perfection
Preheat your oven to 375°F with a baking stone or inverted baking sheet on the middle rack. This helps create steam and gives you that perfect oven spring. Once preheated, bake the bread for 25-30 minutes until it's deep golden brown and sounds hollow when tapped on the bottom.
I know it seems like too much time, but trust me—the bread continues cooking after you take it out. Let it cool on a wire rack for at least 15 minutes before slicing. This resting period allows the crumb to set properly and prevents a gummy texture. The crust should be crispy and aromatic, with those beautiful herb flecks visible throughout.
🍽️ Step 5: Serve Warm with Olive Oil
Slice the warm bread and serve with a drizzle of extra-virgin olive oil—this is where the magic happens. The warm bread soaks up the oil beautifully, enhancing all those Mediterranean flavors. I like to serve it with charcuterie boards, soups, or as a side to grilled meats. Each bite should deliver crispy crust, tender crumb, and bursts of rosemary and thyme.
If you're feeling fancy, you can even make garlic butter by mixing softened butter with minced garlic and serve it alongside. This bread keeps well at room temperature for 2-3 days wrapped in a cloth, or you can freeze slices for up to 3 months. The flavors only get better as it sits!
Pro Tips For Making Antipasto Bread
- TEST YEAST FIRST: Skip straight to mixing if your yeast is old—dissolve it in warm water (110°F) with a pinch of sugar first. If it doesn’t foam in 5 minutes, toss it and start fresh. No one wants a dense brick of dough because their yeast ghosted them.
- OIL THE BOWL: Coat your mixing bowl with olive oil before adding the dough—it’ll prevent sticking and make cleanup almost nonexistent. I used to skip this, then spent 20 minutes prying dough off the sides. Not worth it.
- KNEAD LESS, REST MORE: Overworking the dough makes it tough. Mix until combined, then let it rise twice—first for 1-2 hours until doubled, then punch it down and rise again. The second rise is where the magic happens, not your arm strength.
- BAKE COLD: Pop the dough in the oven straight from the fridge after shaping—cold dough bakes slower, giving you a crisp crust and soft interior. I resisted this for years, then realized my bread was always gummy. Now I set a timer to pull it out of the fridge 30 minutes before baking.
Troubleshooting great antipasto bread
Dough Too Sticky
If your dough feels like glue after kneading, don’t panic—this is normal with olive oil-rich doughs. Wet your hands slightly and keep a bowl of flour nearby for quick cleanup, but avoid over-flouring or the bread will turn tough.
I find using 1 tablespoon of flour per handful of dough works perfectly. For extra help, chill the dough for 15-20 minutes before shaping to firm it up. 💡
Yeast Not Activating
If your yeast mixture doesn’t bubble within 10 minutes, your yeast is likely dead—common if stored too long or exposed to cold. Always use fresh yeast (opened within 4 months) and test water temperature with your finger (should feel warm like bathwater).
For a quick fix, try 1 tsp granulated sugar or 1 tsp honey to jumpstart sluggish yeast. 🍞
Bread Collapses During Baking
This usually happens if the dough wasn’t proofed enough or the oven wasn’t hot enough. Let your dough rise until it’s nearly doubled in size and jiggly when shaken. Preheat your oven with a baking stone for 30 minutes before baking—this ensures proper oven spring.
If it still collapses, try baking at 400°F for 10 minutes first to set the structure, then reduce to 375°F to finish. ⚡
Dry or Dense Crumb
A dry or dense texture often means over-kneading or insufficient hydration. Knead just until the dough springs back slowly when poked (8-10 minutes max). If your dough feels too stiff, add 1 teaspoon of olive oil at a time until it’s pliable.
For extra moisture, brush the baked loaf with olive oil while warm—this keeps it tender for days. 🌿
Uneven Browning
For spotty browning, rotate your baking sheet halfway through baking. If the top isn’t golden enough, try tenting the bread with aluminum foil for the first 15 minutes, then uncovering it. A baking stone or inverted baking sheet on the middle rack helps create even heat.
For extra color, brush the loaf with olive oil before baking or sprinkle with cornmeal for a rustic finish. 🔥
Herbs Not Distributing Evenly
If your herbs clump or show up in patches, fold them into the dough more gently. Press the dough into a flat disk and sprinkle herbs evenly, then fold by pinching and stretching the edges toward the center.
For stronger flavor, chop herbs slightly finer or use 1 extra tablespoon. If using dried herbs, toast them briefly in olive oil before mixing for deeper aroma. 🌶️
Nutrition facts
Frequently asked questions
Can I make this antipasto bread without fresh herbs?
Yes! Use 1 teaspoon dried rosemary and 0.5 teaspoon dried thyme instead of fresh. Toast the dried herbs in 1 tablespoon olive oil for 1 minute before mixing to intensify their flavor. For garlic, use 1 extra clove (minced) to compensate for the loss of fresh aroma.
How do I store leftover antipasto bread?
Wrap the cooled loaf in a clean kitchen towel or beeswax wrap to keep it soft. Store at room temperature for 2-3 days or freeze slices for up to 3 months. To revive stale bread, warm slices in a 350°F oven for 5 minutes or toast in a pan with olive oil.
What’s the best way to serve this bread?
Slice warm bread and drizzle with extra-virgin olive oil for instant flavor. Pair with antipasto staples like prosciutto, marinated olives, or roasted red peppers. For a hearty meal, serve with Italian soups or as a side to grilled meats. The crust stays crispy when served at room temperature.
Can I add cheese to this recipe?
Fold in 1 cup shredded pecorino or parmesan when incorporating herbs. For a stronger flavor, use 0.5 cup and reduce olive oil by 1 tablespoon. Sprinkle extra cheese on top before baking for a golden, cheesy crust.
Why does my dough smell like yeast?
The strong yeast aroma is normal and fades as the dough rises. If the smell is overpowering, your yeast might be too active—reduce to 2 teaspoons next time. For a milder taste, let the dough rise in a cooler spot (70°F) for 3 extra hours to allow flavors to mellow.