
Side Dishes
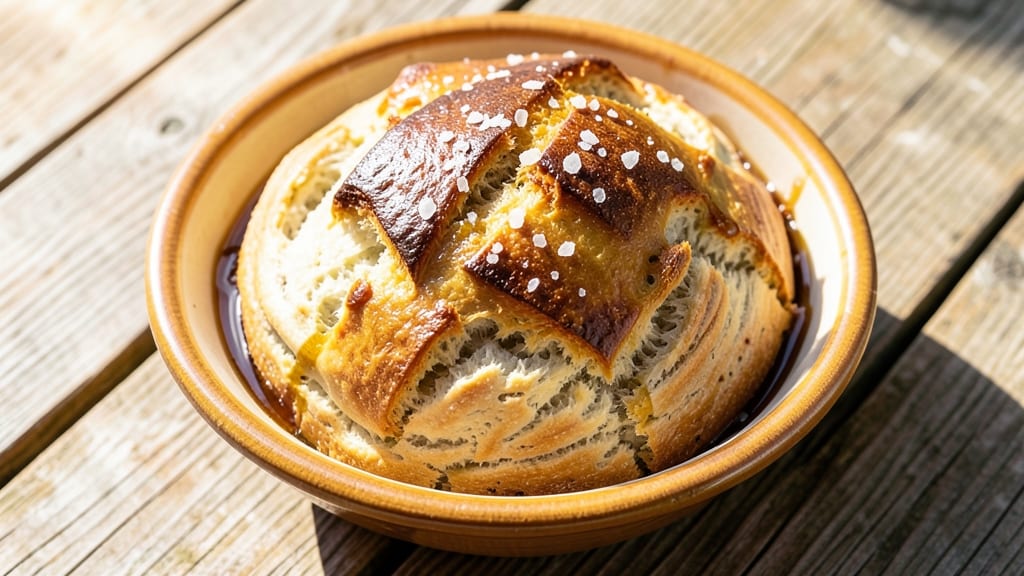
This arrowroot flour bread recipe delivers a light, airy loaf that rivals traditional wheat bread—without a single grain of gluten. The secret lies in arrowroot's ability to create a tender crumb with just the right chew, perfect for sandwiches or toast.
Unlike dense gluten-free loaves, this bread rises beautifully and stays moist for days.
Arrowroot flour works differently than wheat flour, requiring precise hydration and a gentle touch during mixing. We'll use a simple blend of arrowroot, psyllium husk powder, and a touch of xanthan gum to mimic gluten's structure while keeping the texture delicate.
The proofing process is key—patience here ensures that signature lightness.
By the time it emerges from the oven, you'll have a golden-brown loaf with a crisp crust and an interior so tender it nearly melts. This bread freezes beautifully too, making it ideal for batch baking.
Whether you're gluten-sensitive or simply exploring alternative flours, this recipe proves gluten-free doesn't mean giving up texture or taste.
The best part? This loaf works equally well for toast, sandwiches, or French toast. For extra flavor, brush the baked loaf with melted butter or sprinkle with everything bagel seasoning. Let's get started on creating your perfect gluten-free loaf.
Ingredients for arrowroot flour bread
Arrowroot flour transforms into a tender, golden loaf with these 12 plant-powered ingredients.
| Ingredient | Amount | Notes |
|---|---|---|
| Arrowroot Flour 🌾 | 2 cups | Fine-ground, sifted before mixing |
| Psyllium Husk Powder 🌿 | ½ cup | Pure, unsweetened blend |
| Xanthan Gum 🧂 | ½ tsp | Pure, unsweetened |
| Active Dry Yeast 🍞 | 1 ½ tsp | Fresh or packet form |
| Granulated Sugar 🍚 | 1 tbsp | White or organic cane |
| Salt 🧂 | 1 ½ tsp | Fine sea salt preferred |
| Unsweetened Almond Milk 🥛 | 1 ¼ cups | Room temperature |
| Vegan Butter, Melted 🧈 | ¼ cup | Full-fat, unsalted |
| Ground Flaxseed 🌰 | 1 tbsp | Freshly ground for binding |
| Water 💧 | ½ cup | Warm, not hot |
| Everything Bagel Seasoning 🧂 | 1 tbsp | For topping, optional |
| Vegan Butter, Melted 🧈 | 1 tbsp | For brushing crust |
Arrowroot flour is the star here—Bob's Red Mill brand is my go-to for consistency, but any fine-ground variety works. Psyllium husk powder is non-negotiable for structure; grab it in the baking aisle at Whole Foods or Trader Joe's. Xanthan gum might be tricky to find—check the gluten-free section or order online. The yeast should be fresh (not expired) for proper rise. For the almond milk, Silk Unsweetened Original works perfectly, but any unsweetened plant milk will do. The flaxseed needs to be freshly ground—pre-ground loses its binding power fast. Warm water activates the yeast, but don't let it get hot or you'll kill it. Everything bagel seasoning adds that perfect crunchy finish, but you can skip it if you prefer a simpler loaf.
No arrowroot flour? Tapioca starch or cassava flour can substitute at a 1:1 ratio, though texture will differ slightly. Short on psyllium husk? Chia seeds soaked in water (1 tbsp chia + 3 tbsp water = 1 tbsp psyllium) work in a pinch. If you can't find xanthan gum, agar powder at half the amount mimics its thickening power. The vegan butter can be swapped for coconut oil if needed, though it adds a subtle coconut flavor. For extra richness, add 1 tbsp nutritional yeast to the dough. The everything bagel seasoning can be replaced with a mix of garlic powder, onion powder, and sesame seeds if you're feeling creative. Just remember—this bread needs time to proof, so don't rush it.
This loaf keeps beautifully for 3-4 days in an airtight container at room temperature, or 1 week in the fridge. For longer storage, slice and freeze portions for up to 3 months. To revive, warm slices in a toaster or oven. The bread freezes exceptionally well before baking too—just thaw overnight in the fridge. Brush the baked loaf with melted vegan butter while still warm for that restaurant-quality crust. Leftovers make amazing croutons or French toast. Portion into individual slices before freezing for easy grab-and-go toast.
Why You'll Love This Recipe
- No-Knead, No-Fuss Rise: I swear by this—just mix, let it sit, and forget about it. The psyllium husk powder does all the heavy lifting, so no shaping or waiting for dough to relax. My loaf is ready while I’m still deciding what to watch on TV.
- Light Yet Substantial: Arrowroot flour keeps it airy, but the yeast and sugar give it just enough warmth to feel like a real bread. It’s not dense or heavy—more like a fluffy, slightly sweet cloud that still holds up to toast or sandwiches.
- Meal Prep MVP: Between us, this bread stays fresh for days in the fridge, and it reheats like a dream. I make two loaves on Sunday, slice them up, and they’re my go-to for quick lunches all week. No sad, dried-out bread here.
- Budget-Friendly Staple: Honestly, the ingredients cost pennies compared to store-bought. A little yeast, a scoop of arrowroot, and psyllium—all things I already have on hand. It’s the kind of bread that makes grocery bills feel lighter without sacrificing taste.
Step-by-step instructions for arrowroot flour bread
This gluten-free loaf rises beautifully and stays light—here's how to make it perfect every time.
Activate the Yeast and Prepare the Wet Ingredients
In a small bowl, whisk together the 1.25 cups unsweetened almond milk, 0.5 cup warm water, and 1 tbsp granulated sugar until fully dissolved. Sprinkle the 1.5 tsp active dry yeast over the mixture and let it sit for 5-10 minutes until it becomes frothy and bubbly. This step ensures your yeast is alive and ready to work—if it doesn't bubble, your bread won't rise properly.
In a separate bowl, melt the 0.25 cup vegan butter and let it cool slightly. Add the 1 tbsp ground flaxseed and stir well. The flaxseed will thicken slightly as it absorbs the melted butter, creating a natural binding agent that mimics eggs in gluten-free baking.
Combine Dry Ingredients and Mix the Dough
In a large mixing bowl, sift together the 2 cups arrowroot flour, 0.5 cup psyllium husk powder, 0.5 tsp xanthan gum, and 1.5 tsp salt. Whisk these dry ingredients thoroughly to eliminate any lumps. The psyllium husk is key here—it helps create that signature bread-like texture and structure that arrowroot alone can't achieve.
Pour the yeast mixture and melted flaxseed-butter blend into the dry ingredients. Using a wooden spoon or dough whisk, gently fold everything together until just combined. Avoid overmixing—you're not making a traditional dough, and too much agitation can develop gluten-like proteins in the psyllium, which will make your bread dense. The mixture should be thick but still pourable.
Let the Dough Rest and Develop Structure
Cover the bowl with a damp kitchen towel and let the dough rest at room temperature for 30-45 minutes. During this time, the psyllium husk will absorb moisture and begin forming its gel-like structure, which is crucial for the bread's texture. You'll notice the mixture becoming thicker and more cohesive as it develops.
After resting, the dough should be firm enough to hold its shape when gently pressed. If it's still too sticky, you can add 1-2 tablespoons more arrowroot flour to help it come together. This resting period is where the magic happens—the psyllium transforms from a powder to a binding agent that gives your bread its characteristic chew and structure.
Shape and Proof the Loaf
Lightly grease a standard 9x5-inch loaf pan with a bit of the 1 tbsp melted vegan butter reserved for brushing. Transfer the dough to the prepared pan and gently shape it into a rectangular loaf. Use a wet spatula to smooth the top and press it down lightly—this helps create an even rise and prevents cracking.
Cover the pan with a damp towel and let the dough proof at room temperature for 1-1.5 hours, or until it has risen about 1 inch above the pan. The proofing time can vary depending on your kitchen's humidity, so keep an eye on it. You're looking for gentle expansion, not a rapid rise that would cause the bread to collapse during baking.
Bake to Golden Perfection
Preheat your oven to 375°F and place a small baking dish filled with ½ inch of water on the lower rack. This creates steam during the initial baking phase, which helps the bread develop a better crust and rise more evenly. Brush the top of the dough with the remaining 1 tbsp melted vegan butter and sprinkle with 1 tbsp everything bagel seasoning if using.
Bake for 40-45 minutes until the top is deep golden brown and a toothpick inserted into the center comes out clean. The bread will rise slightly more in the oven, so don't be alarmed if it looks like it's overflowing the pan. If the top browns too quickly, tent it loosely with aluminum foil after 20 minutes to prevent over-browning while the center finishes cooking.
Pro Tips For Making Arrowroot Flour Bread
- Whisk the Psyllium: Mix the psyllium husk powder into your wet ingredients first—it clumps like crazy if you toss it dry. I learned this after staring at a lumpy dough wondering why my bread collapsed. A quick whisk with the water or milk before adding anything else saves you from reworking the whole batch.
- Proof at 78°F: Yeast loves consistency—if your kitchen’s colder than 78°F, pop the dough in a warm spot (like the oven with the light on) for 10–15 minutes before letting it rise. I used to skip this in winter and end up with a sad, slow proof. Trust me, the yeast will thank you with a proper lift.
- Skip the Overmixing: Once you add the arrowroot flour, stop folding. This stuff turns gummy fast, and overworking it makes the bread dense. Just combine everything until just combined—no need to chase the last bit of flour into submission. Your bread will stay light and airy if you resist the urge to "fix" it.
- Brush with Honey: Swap the final water brush for a light honey glaze (1 tsp honey + 1 tsp water) before baking. The sugar caramelizes faster, giving you that golden crust without burning. I was skeptical until I tried it—now it’s my non-negotiable for a crispy, bakery-style finish.
Troubleshooting this dish
Dense or Gummy Texture
If your arrowroot bread turns out dense or gummy, you likely overmixed the dough or didn’t let the psyllium husk develop its structure properly. The psyllium needs that 30-45 minute rest to absorb moisture and form its gel-like binding.
I’ve found that using a wooden spoon or dough whisk and mixing just until combined prevents overdevelopment of gluten-like proteins in the psyllium. Also, ensure your psyllium husk powder is fresh—old powder loses its binding power. 🌟
Poor Rise or Flat Loaf
A flat loaf usually means the yeast didn’t activate properly or the proofing time was insufficient. Always check your yeast by sprinkling it into warm liquid with sugar—it should bubble within 5-10 minutes.
If proofing at room temperature isn’t working (especially in humid climates), try placing the covered pan in a 75°F oven with the light on for a more controlled environment. A 1-1.5 hour proof is ideal, but don’t exceed 2 hours or the bread may collapse. 🔥
Cracked or Uneven Top
Uneven tops often happen when the dough isn’t shaped evenly or the oven isn’t properly preheated. Before baking, use a wet spatula to smooth the dough’s surface and press it down lightly—this creates a uniform rise.
Preheat your oven for at least 20 minutes at 375°F to ensure even heat distribution. If cracks appear, brush the top with melted vegan butter immediately after baking to seal them.
For extra insurance, place a baking dish with ½ inch of water on the lower rack to create steam during the first 20 minutes of baking. ✨
Dry or Crumbly Crust
A dry crust usually means the bread baked too long or the oven was too hot. Pull the bread from the oven when it reaches an internal temperature of 190-200°F—overbaking dries out arrowroot flour quickly.
If the crust is too dry, brush it with melted vegan butter while still warm to restore moisture. To prevent this, tent the loaf loosely with aluminum foil after 20 minutes if the top browns too quickly.
For a softer crust, reduce the oven temperature to 350°F for the final 10 minutes of baking. 💫
Sticky or Raw Center
A sticky or raw center happens when the bread didn’t bake long enough or the oven wasn’t hot enough. Arrowroot flour requires a slightly longer bake than wheat flour—aim for 40-45 minutes at 375°F.
To test doneness, insert a toothpick into the center; it should come out clean with just a few moist crumbs. If the center is still sticky, return the bread to the oven for 5-10 more minutes. For even baking, rotate the pan halfway through the bake.
If your oven runs hot, reduce the temperature to 350°F and check frequently. 💡
Nutrition facts
Frequently asked questions about arrowroot flour bread
Why does arrowroot flour bread need psyllium husk?
Psyllium husk is essential because arrowroot flour lacks gluten's structural proteins. The husk absorbs moisture and forms a gel-like network that mimics gluten's binding properties, giving your bread that signature chew and rise. Without it, your loaf would be crumbly and dense. Think of it as the secret ingredient that transforms arrowroot from a thickener into a bread-like texture.
Can I make this bread without xanthan gum?
Yes, but your bread may be slightly less tender. Replace the 0.5 tsp xanthan gum with 0.25 tsp agar powder or 1 tbsp ground flaxseed (in addition to the recipe's flaxseed). Both create a similar thickening effect, though agar has a neutral flavor while flaxseed adds a subtle nuttiness. For best results, use the substitution during the dough mixing stage.
How do I store arrowroot flour bread to keep it fresh?
Store your baked loaf in an airtight container at room temperature for 3-4 days, or wrap individual slices tightly in plastic wrap for 5-6 days. For longer storage, freeze the whole loaf (unwrapped) for up to 3 months. To revive, thaw overnight in the fridge and warm in a toaster or oven. The bread freezes beautifully before baking too—just thaw before proofing.
What's the best way to check if this bread is fully baked?
Use the toothpick test: Insert a thin skewer into the center—it should come out clean with just a few moist crumbs (not wet batter). Arrowroot bread is done when the internal temperature reaches 190-200°F. If the top browns too quickly, tent loosely with aluminum foil after 20 minutes to prevent over-browning while the center finishes cooking. The bread will continue rising slightly in the oven.
Can I add seeds or nuts to this bread?
Stir in 2-3 tablespoons of seeds (sunflower, pumpkin, or sesame) or ½ cup chopped nuts (walnuts, pecans) during the final dough mixing. For extra flavor, toast the seeds/nuts first. Just reduce the arrowroot flour by 1-2 tablespoons to maintain proper dough consistency. Spread them evenly on top before baking for a decorative crunch.