
Side Dishes
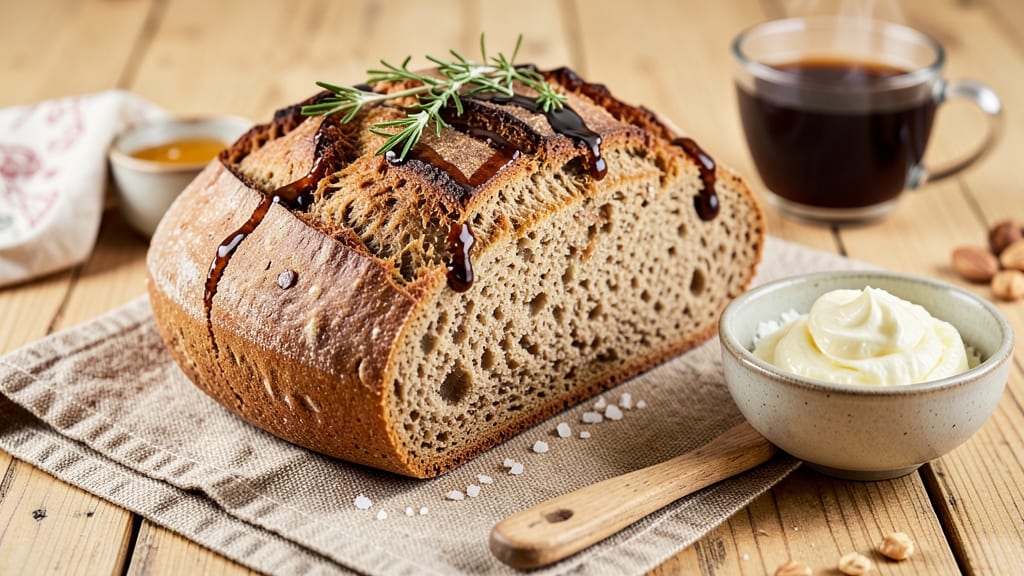
This artisan brown bread recipe delivers that perfect balance of rustic crust and nutty sweetness that makes homemade bread worth every minute. 💛 The secret lies in combining whole wheat flour with a touch of honey and molasses, creating a loaf that's hearty enough for sandwiches but delicate enough to stand alone.
I've perfected this version after years of baking, using a simple yet effective method that yields bread with an irresistible aroma and satisfying crumb.
What sets this recipe apart is the attention to traditional techniques without requiring advanced skills. We'll use a basic sourdough starter for depth of flavor, but don't worry—this isn't your grandmother's complicated recipe.
The dough develops naturally through proper kneading and proofing, resulting in that signature open crumb structure and crispy exterior that's impossible to resist. The addition of whole grains not only enhances nutrition but also contributes to that characteristic nutty flavor.
By the time you pull this loaf from the oven, you'll have achieved that perfect golden-brown crust with a tender interior that's slightly sweet with every bite.
The aroma alone will have everyone gathering in the kitchen, and the texture—crisp on the outside, soft and airy within—is exactly what you'd expect from a true artisan loaf. This bread freezes beautifully too, so you can make a batch and enjoy it for weeks.
Whether you're serving it with soup, using it for sandwiches, or simply enjoying it with butter, this artisan brown bread brings a touch of rustic charm to any meal.
The best part? You'll have the satisfaction of knowing exactly what went into every bite. Let's get started on creating your perfect loaf.
Ingredients for artisan brown bread
Rustic whole wheat flour meets honey and molasses for that perfect artisan crumb you crave.
| Ingredient | Amount | Notes |
|---|---|---|
| Active Sourdough Starter 🍞 | ½ cup | Unfed, bubbly starter |
| Whole Wheat Flour 🌾 | 2 ½ cups | Unbleached, medium grind |
| All-Purpose Flour 🌾 | 1 ½ cups | White, for structure |
| Honey 🍯 | ¼ cup | Raw, for natural sweetness |
| Molasses 🍯 | ⅛ cup | Unsulphured, for depth |
| Warm Water 💧 | 1 ¼ cups | 110°F for activation |
| Salt 🧂 | 1 tsp | Diamond Crystal preferred |
| Olive Oil 🫒 | 2 tbsp | Extra-virgin for richness |
| Instant Yeast 🍞 | ¼ tsp | For backup rise |
| Cornmeal 🌽 | ¼ cup | For dusting loaf pan |
The sourdough starter is your flavor foundation—feed it daily for 5 days before baking to build strength. King Arthur or Bob's Red Mill flours work best for this recipe, but any unbleached whole wheat will do. Honey should be raw and unfiltered (the good stuff), and molasses? Unsulphured is key—it's what gives that deep, nutty flavor. If you can't find unsulphured, regular works but adds a slightly bitter note. The warm water is critical—110°F activates the yeast perfectly without killing it.
No sourdough starter? Instant yeast plus 1 tbsp sugar gets you close, though the flavor won't be as complex. Substituting white flour for half the whole wheat makes the dough easier to handle (great for beginners). Coconut oil can replace olive oil if you're avoiding dairy, though it lacks that fruity richness. The cornmeal? Any coarse grain works—just make sure it's toasted for extra flavor. And if your kitchen's too hot for a sourdough starter, store-bought dough can be shaped into a loaf with these same ingredients.
This dough needs 2 hours of proofing at room temp—don't rush it. Shape the loaf gently to avoid tearing the crust. Freeze the whole loaf for up to 3 months—just thaw overnight at room temp. For extra crunch, brush the cooled loaf with melted butter. The aroma alone will have everyone thinking you baked for hours—it's that good.
Why You'll Love This Recipe
- No-Knead Magic: I swear by this—just mix, let it rise, and bake. The sourdough starter does all the heavy lifting while I sip coffee, no standing and punching dough in sight.
- Sweet & Smoky Depth: That honey and molasses combo? It’s like a warm hug in every bite—caramelized crust with a moist, slightly sweet crumb that’s ridiculously satisfying straight from the oven.
- Weeknight Workhorse: Toss it in lunchboxes, serve with butter for breakfast, or pair it with soup when you’re too tired to plan dinner. It’s the one loaf that does it all without fuss.
- Budget-Friendly Staple: Whole wheat flour and sourdough starter stretch my grocery budget, and a single batch lasts us days—even my picky kid devours the crust. Win-win for my wallet and my sanity.
Step-by-step instructions for artisan brown bread
Here's how to craft a loaf with a crackly crust and sweet, nutty crumb—every bite is pure comfort.
👨🍳 Step 1: Mix the Wet Ingredients and Activate the Starter
In a large mixing bowl, combine the 0.5 cup Active Sourdough Starter, 0.25 cup Honey, 0.125 cup Molasses, 2 tbsp Olive Oil, and 1.25 cups Warm Water (about 110°F). Stir until everything is fully incorporated—you should see the starter begin to bubble slightly as it wakes up. This mixture should be smooth but slightly sticky.
Let this sit at room temperature for 10-15 minutes while you prepare the dry ingredients. The honey and molasses will help feed the starter, giving it a head start for the rise. If you notice the mixture getting too thick, add 1 tablespoon of warm water to maintain the right consistency.
👨🍳 Step 2: Combine Dry Ingredients and Form the Dough
In a separate bowl, whisk together the 2.5 cups Whole Wheat Flour, 1.5 cups All-Purpose Flour, 1 tsp Salt, and 0.25 tsp Instant Yeast. Sift the mixture lightly to aerate the flours—this helps create a lighter, more open crumb in your bread.
Gradually add the dry ingredients to the wet mixture, stirring with a wooden spoon or dough whisk until just combined. You’re looking for a shaggy dough that’s still slightly sticky but holds together when pressed. Avoid overmixing—this can develop too much gluten and make the bread dense. If the dough feels too dry, add 1 tablespoon of warm water at a time until it reaches the right consistency.
🥘 Step 3: Knead and Bulk Ferment for Depth of Flavor
Turn the dough onto a lightly floured surface and knead for 8-10 minutes by hand or 5-6 minutes in a stand mixer with a dough hook. You’ll know it’s ready when the dough is smooth, elastic, and springs back slowly when poked. This kneading step develops the gluten structure, which gives the bread its chewy texture and ability to hold its shape.
Place the dough back in the bowl, cover it with a damp towel, and let it rise at room temperature for 1-2 hours. You’re aiming for about 50-75% bulk fermentation—the dough should nearly double in size and feel slightly puffy. Poke it gently; if it springs back slowly, it’s ready for shaping. If not, let it rise a bit longer. This step is where the magic happens—the longer the ferment, the more complex and flavorful your bread will be.
🔪 Step 4: Shape and Proof the Loaf
Lightly flour a work surface and gently deflate the dough by pressing it down with your fists. Shape it into a 9x5-inch loaf pan, tucking the edges under to create a smooth, tight surface. This shape ensures an even rise and a uniform crust. Brush the top of the dough with a little olive oil and sprinkle 0.25 cup Cornmeal evenly over the surface—this will give your bread that classic rustic look and prevent sticking.
Cover the loaf pan with a damp towel and let it proof at room temperature for 1-1.5 hours, or until the dough has risen to about 1 inch above the rim of the pan. The cornmeal should look slightly puffy, and the dough should feel firm to the touch. If your kitchen is cold, proofing may take a bit longer—just keep an eye on it. Overproofing can lead to a dense crumb, so don’t let it rise too much.
🔥 Step 5: Bake for a Crispy Crust and Nutty Crumb
Preheat your oven to 375°F and place a baking sheet on the lower rack. This creates steam, which helps the bread develop a crispy crust. Once the oven is fully preheated, carefully transfer the loaf pan to the oven and bake for 45-50 minutes, or until the top is deep golden brown and the internal temperature reaches 205-210°F when measured with an instant-read thermometer.
If the top browns too quickly, tent the loaf with a piece of aluminum foil to prevent over-browning while it finishes baking. The bread is done when it sounds hollow when tapped on the bottom and pulls away cleanly from the sides of the pan. Let it cool in the pan for 10 minutes, then transfer to a wire rack to cool completely. This resting time allows the crumb to set, making it easier to slice and preventing a gummy texture.
Pro Tips For Making Artisan Brown Bread
- Mix the Dough by Hand: I resisted this for years—until I realized kneading whole wheat dough in a stand mixer just turns it into glue. Use your knuckles and the heel of your palm to develop the gluten properly. It takes 10-15 minutes of serious work, but the bread’s chew and structure improve dramatically.
- Let the Starter Ripen Fully: That bubbly, jiggly peak isn’t just for show—wait until your sourdough starter has doubled and collapsed slightly before mixing. I learned this the hard way when my bread tasted flat and underproofed. Patience here means better flavor and rise.
- Steam the Loaf Early: Skip the foil tent after 15 minutes in the oven—just spray the pan with water before baking. The steam locks in moisture and gives you that perfect crack on top. (Yes, even if you’re impatient like me.) Do this, or you’ll end up with a dry, sad loaf.
- Balance Honey and Molasses: Whole wheat flour absorbs liquid differently, so if your dough feels too sticky, reduce molasses by 1 tablespoon and add 1 tablespoon honey instead. The honey helps with browning and sweetness without making the dough cling to everything. Trust me, your hands will thank you.
Troubleshooting great artisan brown bread
Dense Dough Issues
If your dough feels too dense or tough after kneading, you likely overdeveloped the gluten. Whole wheat flour absorbs more water than all-purpose, so add 1-2 tablespoons of warm water at a time until the dough reaches a slightly sticky but manageable consistency.
For a lighter crumb, reduce the whole wheat flour by ¼ cup and increase all-purpose flour by the same amount. Over-kneading is a common culprit—stop when the dough springs back slowly after being poked. 💛
Underproofed Bread
An underproofed loaf will be dense and gummy. Check for readiness by gently pressing your finger into the dough—it should leave a slight indentation that slowly springs back.
If your kitchen is cold (65°F or below), extend proofing time by 30-60 minutes or use a slightly warmer spot (like the oven with the light on). A proofing box (a container with warm water) can help maintain consistent temperatures. Never skip this step—rushing leads to disappointing texture.
Pale or Soft Crust
A pale crust usually means the bread didn't bake long enough or the oven wasn't hot enough. For a deeper color, bake at 375°F for the full 45-50 minutes and tent with foil only if the top browns too quickly.
Brush the loaf with egg wash (1 egg + 1 tbsp water) before baking for extra shine and crust development. If your oven runs hot, reduce temperature to 350°F and bake for 55-60 minutes. A baking stone or steel on the lower rack creates steam for a crispier crust.
Uneven Rise
Uneven rise often happens when dough isn't shaped properly or proofed at inconsistent temperatures. For a 9x5-inch loaf pan, press the dough firmly into the corners and tuck edges under to create surface tension. If one side rises more, rotate the pan halfway through proofing.
Cold spots in your kitchen can cause uneven rising—proof near the oven (with the light on) for consistency. For extra insurance, use a proofing basket lined with a floured towel to shape free-form loaves.
Gummy Interior
A gummy interior usually means the bread didn't bake long enough or was cooled too quickly. Always bake until internal temperature reaches 205-210°F—a meat thermometer is your best friend. Let the loaf cool in the pan for 10 minutes before transferring to a wire rack.
If your bread still feels gummy, try reducing the honey by 1 tablespoon (sweetness retains moisture) and increasing the molasses slightly for better oven spring. A steam injection (spraying water on oven walls) can also improve texture.
Starter Not Bubbly
If your sourdough starter isn't active, it may need more feeding or time to develop. Feed it daily with equal parts flour and water for 5-7 days before using.
If you're in a hurry, mix 1 tbsp sugar with the 0.25 tsp instant yeast for backup rise, though flavor will be less complex. For a stronger starter, try rye flour (10% of total flour) in your dough—it boosts fermentation.
Always use an unfed, bubbly starter (peak of activity) for best results. 🔥
Nutrition facts
Frequently asked questions about artisan brown bread
Can I make this recipe without a sourdough starter?
Mix 1 tbsp sugar with the 0.25 tsp instant yeast to activate it. While the flavor won't be as complex, this backup method still yields delicious bread. For even better results, use rye flour (10% of total flour) to boost fermentation naturally. Just ensure your starter is bubbly if using it later.
How do I store leftover artisan brown bread?
Wrap the cooled loaf tightly in plastic wrap or place it in an airtight container to keep it fresh for 3-4 days at room temperature. For longer storage, freeze the whole loaf for up to 3 months. Thaw overnight at room temperature for the best texture.
Why does my bread turn out dense instead of light and airy?
Dense bread usually results from over-kneading or underproofing. Stop kneading when the dough springs back slowly when poked. For proofing, let the dough rise until it nearly doubles in size (1-2 hours). If your kitchen is cold (65°F or below), extend proofing time by 30-60 minutes or use a warm spot.
Can I add seeds or nuts to this recipe?
Yes! Add ¼ cup seeds (sunflower, pumpkin) or nuts (walnuts, pecans) to the dough during the final kneading. For extra flavor, toast them first. Just reduce the all-purpose flour by ¼ cup to maintain dough consistency. Sprinkle them on top before baking for a decorative crust too!
What’s the best way to reheat stale artisan brown bread?
Slice the bread and warm it in a 350°F oven for 5-7 minutes with a few ice cubes on a tray below for steam. Alternatively, toast slices in a toaster until crispy. For a quick fix, wrap slices in a damp paper towel and microwave for 10-15 seconds. Avoid over-microwaving—it can make bread gummy.