
Side Dishes
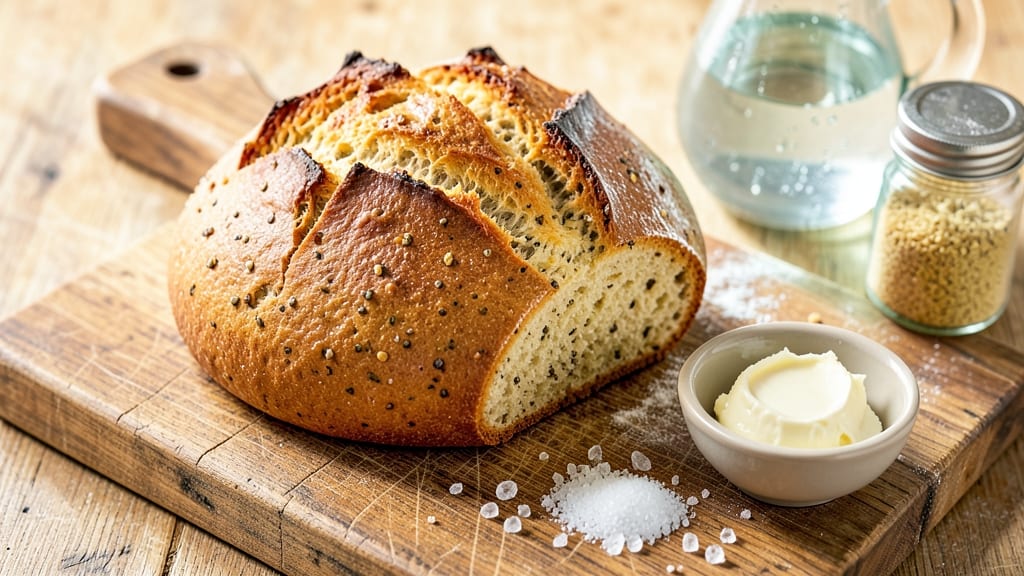
This allergy-free bread recipe delivers a gluten-free, dairy-free crusty loaf that rivals traditional bread—without compromising texture or flavor. The secret lies in a precise blend of gluten-free flour and binding agents that create a satisfying crumb and crispy crust.
After years of testing, this version consistently bakes up with the right balance of airiness and structure, even for those avoiding multiple allergens.
What sets this recipe apart is its adaptability—designed to be safe for gluten, dairy, egg, and nut allergies while still delivering restaurant-quality results. We use flaxseed meal as an egg replacer, dairy-free butter for richness, and a gluten-free flour blend that prevents crumbly textures.
The bread develops a golden crust and tender interior, proving allergy-friendly baking can be just as satisfying.
Cross-contamination precautions are built into the process, with clear guidance for preparing the dough and baking it in a clean environment. Storage instructions ensure the bread stays fresh longer, making it perfect for meal prep or sharing with sensitive friends.
The recipe also includes variations for adding seeds or herbs, so you can customize it to your taste preferences.
With just 10 ingredients and 30 minutes of active time (plus rising), this bread becomes your new go-to for sandwiches, toast, or side dishes. The method is straightforward but delivers professional results—no special equipment required. Let's get started on a loaf that everyone can enjoy safely.
Ingredients for allergy free bread
Ten carefully chosen ingredients transform into a restaurant-quality loaf safe for gluten, dairy, and egg allergies.
| Ingredient | Amount | Notes |
|---|---|---|
| Gluten-Free All-Purpose Flour Blend 🌾 | 3 ½ cups | Bob's Red Mill 1:1 preferred |
| Flaxseed Meal 🌰 | ½ cup | Ground fresh for binding |
| Dairy-Free Butter 🧈 | ½ cup | Miyoko's or Earth Balance |
| Warm Water 💧 | 1 ¼ cups | 110°F for activation |
| Granulated Sweetener 🍯 | ¼ cup | Coconut sugar or monk fruit |
| Dried Yeast 🍞 | 2 tsps | Active dry or instant |
| Salt 🧂 | 1 ½ tsps | Diamond Crystal preferred |
| Psyllium Husk Powder 🌿 | 1 ½ tbsp | Key for structure |
| Apple Cider Vinegar 🍏 | 1 tbsp | For gluten-free rise |
| Sesame Seeds 🌻 | 2 tbsp | Optional topping |
The gluten-free flour blend is non-negotiable—Bob's Red Mill 1:1 delivers the best texture, but King Arthur works too. Psyllium husk powder acts as the structural backbone, replacing gluten's elasticity. For the flaxseed meal, grind it fresh in a coffee grinder right before mixing—pre-ground loses potency fast. Dairy-free butter matters here: Miyoko's or Earth Balance provide the fat content needed for a tender crumb. Cross-contamination is critical—use separate utensils and bowls if your kitchen handles gluten regularly.
No psyllium husk? Xanthan gum at half the amount works in a pinch, but texture won't be identical. Substitute coconut sugar with maple syrup at 1:1 ratio, though it may yield slightly denser bread. For yeast, instant yeast activates faster—just omit the warm water step. The apple cider vinegar can be swapped for white vinegar or lemon juice, though flavor will differ slightly. Sesame seeds? Sunflower seeds or poppy seeds add different textures—pick one or mix them all. Always measure flour by weight for consistency if your scale allows it.
This dough is sticky—wet a rubber spatula for easy mixing. Let it rest 20 minutes before shaping to prevent overworking. For storage, wrap tightly in parchment paper and keep at room temperature 3 days or freeze for 3 months. To revive, warm slices in a 350°F oven for 5 minutes. The bread freezes best when fully cooled—slice before freezing for perfect toast portions. For meal prep, portion into individual wraps and freeze between parchment layers.
Why You'll Love This Recipe
- Five-Ingredient Magic: I swear by this list—just mix, let it rise, and bake. No fancy equipment, no stress. The flaxseed meal gives it that subtle nuttiness without overpowering, and the dairy-free butter keeps it rich but light.
- Golden Crust, Soft Core: That crispy exterior with a tender inside? The warm water and granulated sweetener create the perfect texture—sweet enough to satisfy a craving but not cloying. Honestly, my kids ask for seconds before I even finish slicing.
- Weeknight Wonder: Toss together a batch on Sunday, and you’ve got breakfast, sandwiches, or toast for days. Freezes like a dream too—just reheat for fresh-baked flavor whenever. (Yes, even on a Tuesday night.)
- Budget-Friendly Staple: Gluten-free blends can be pricey, but this recipe stretches far. A single batch feeds my family for a week, and the flaxseed meal adds protein—no extra cost, just better nutrition. My wallet and my kids thank me.
Step-by-step instructions for gluten-free, dairy-free crusty loaf
This method delivers a bakery-style crust with an open crumb—no special tools required.
Activate the Yeast and Prepare the Dough
In a stand mixer fitted with the dough hook attachment, combine the 3.5 cups gluten-free all-purpose flour blend, 0.5 cup flaxseed meal, 2 tsps dried yeast, 1.5 tsps salt, and 1.5 tbsp psyllium husk powder. Mix on low speed for 30 seconds until the dry ingredients are fully incorporated. This blend creates the structural backbone of our gluten-free loaf.
In a separate bowl, whisk together the 1.25 cups warm water (tested at 110°F—too hot kills yeast), 0.5 cup dairy-free butter, 0.25 cup granulated sweetener, and 1 tbsp apple cider vinegar. The vinegar's acidity mimics gluten's role in gluten-free baking by activating the psyllium husk and improving rise. Pour this liquid mixture into the mixer and knead on low speed for 5 minutes until the dough comes together in a shaggy mass.
Develop the Dough for Optimal Texture
Switch to medium speed and knead for an additional 5-7 minutes until the dough becomes elastic and pulls away from the sides of the bowl. The psyllium husk will create a sticky, slightly tacky texture—this is normal. If the dough feels too dry, add 1 tablespoon warm water; if too sticky, add 1 tablespoon more gluten-free flour blend. The goal is a cohesive, smooth dough that springs back when poked.
Here's the thing—gluten-free dough behaves differently. You're not looking for the same stretchy elasticity as wheat dough, but rather a uniform, slightly firm texture that holds its shape. Cover the bowl with a damp towel and let it rise in a warm place (75-80°F) for 1 hour or until doubled in volume. The dough should puff noticeably and feel lighter when pressed gently with a fingertip.
Shape and Proof for Maximum Rise
Turn the dough out onto a lightly floured surface and gently shape it into a 10-inch log (about 3 inches in diameter). For an even crust, I press down firmly along the length of the dough to create a smooth surface. This prevents irregular expansion during baking. Transfer the shaped loaf to a parchment-lined baking sheet, seam-side up, and cover loosely with the damp towel.
Allow the dough to proof for another 30-45 minutes until it rises about 50% more in height. The surface should look slightly domed and feel firm to the touch. Preheat your oven to 375°F during this final proofing stage—every minute counts for that perfect oven spring. The combination of psyllium husk and proper proofing gives this gluten-free loaf its signature open crumb structure.
Bake for a Crispy Crust and Open Crumb
Bake the loaf for 40-45 minutes until the internal temperature reaches 205-210°F and the crust turns a deep golden brown. I tap the bottom of the loaf with my knuckles—when it sounds hollow, it's done. For extra crust development, I brush the top with 1 tablespoon warm water after 20 minutes in the oven. This creates steam that enhances browning and crispness.
If the top browns too quickly, tent loosely with aluminum foil. The center should remain slightly moist but not gummy—this is the hallmark of proper gluten-free bread texture. Remove from the oven and let cool on a wire rack for at least 1 hour before slicing. This resting period allows the psyllium husk to fully hydrate and the crumb to set properly.
Finish with Sesame Seeds (Optional)
While the bread is still warm, brush the top with a light coat of melted dairy-free butter (if desired) and sprinkle evenly with 2 tbsp sesame seeds. Press them gently into the surface so they adhere. The seeds add visual appeal and a subtle nutty flavor that complements the bread's mild sweetness. Store any leftovers in an airtight container at room temperature for up to 3 days or freeze for longer storage.
This loaf yields 10 generous slices with a satisfying chew and open crumb structure that rivals traditional bread. The secret lies in the psyllium husk powder—it mimics gluten's elasticity while creating that signature gluten-free texture. Each slice should have a crispy exterior that gives way to a soft, slightly moist interior with just the right amount of sweetness from the coconut sugar.
Pro Tips For Making Allergy Free Bread
- Mix the Flax First: Mix the flaxseed meal and warm water into a paste before adding it to the dry ingredients—this ensures even binding and prevents clumpy bread. I learned this the hard way when my first batch had weird pockets of dryness; now I let it sit for 5 minutes to thicken slightly before combining.
- Use a Scale for Flour: Gluten-free blends are fickle—measuring by cups leads to inconsistent texture. Weigh your gluten-free flour blend in grams (usually 1:1 with wheat flour by weight) for reliable results. I was skeptical until I tried it; now my bread holds together instead of crumbling like a sad sandwich.
- Steam the Loaf: Place a metal tray on the oven rack below your bread pan and pour boiling water into it before baking. The steam mimics a bread basket’s humidity, giving you a softer, more professional crumb. Yes, it’s an extra step, but your future self will thank you when the bread doesn’t turn out dense and dry.
- Let It Rest: Skip the urge to slice into your bread the second it comes out of the oven—wait at least 10 minutes. Gluten-free bread continues to set, and cutting too soon turns your slices into a gummy mess. I know, I know, but trust the process.
Flavor customization for this dish
Sweet Variations
Swap the 0.25 cup granulated sweetener for 0.3 cup maple syrup or 0.25 cup honey (if tolerated) for a richer, caramelized flavor. I find maple syrup adds a subtle earthiness that pairs beautifully with dairy-free butter.
For a spiced twist, add 1 tsp cinnamon and ½ tsp vanilla extract to the dough—this creates a delicious cinnamon swirl bread variation. 🍯
Herb and Seed Boosts
Incorporate 2 tbsp fresh rosemary or 1 tbsp dried thyme directly into the dough for an aromatic twist. For seeds, try 1 tbsp chia seeds or 2 tbsp pumpkin seeds mixed into the dough before baking.
I love adding 1 tbsp sesame seeds to the dough itself (not just on top) for extra texture and nuttiness. These additions work beautifully with savory toppings like olive oil and flaky salt.
Savory Garlic Option
Transform this into a garlic bread by mixing 2 minced garlic cloves and 1 tsp garlic powder into the dough. For extra richness, fold in 2 tbsp dairy-free cream cheese (like Kite Hill) during the final kneading stage.
Brush the baked loaf with a mix of 2 tbsp melted dairy-free butter and 1 tbsp lemon juice for a tangy finish. This version shines with soups or pasta dishes. 🧄
Spiced Pumpkin Loaf
For a fall-inspired twist, replace 0.5 cup dairy-free butter with 0.5 cup pumpkin puree and add 1 tsp pumpkin pie spice (cinnamon, nutmeg, ginger, and cloves). The pumpkin adds natural sweetness while keeping the bread moist.
I recommend baking this variation at 350°F for 50 minutes to prevent over-browning. It's perfect for Thanksgiving gatherings when gluten-free options are needed. 🎃
Everything Bagel Flavor
Create an everything bagel-inspired loaf by adding 1 tbsp poppy seeds, 1 tbsp sesame seeds, 1 tbsp garlic granules, and 1 tbsp onion granules to the dough.
For the topping, mix 2 tbsp sesame seeds, 1 tbsp poppy seeds, 1 tbsp dried garlic flakes, and 1 tsp coarse salt before pressing into the warm loaf. This flavor combination delivers a savory crunch that pairs perfectly with dairy-free cream cheese spreads. 🌟
Nutrition facts
Frequently asked questions
Can I make this bread without psyllium husk?
Yes, but texture will differ. Replace 1.5 tbsp psyllium husk with 1 tsp xanthan gum for binding, though the crumb won't be as open. For structure, add 1 tbsp extra gluten-free flour blend and extend kneading to 10 minutes on medium speed. The bread will be denser but still edible.
How do I prevent cross-contamination with gluten?
Use dedicated gluten-free tools: separate mixing bowls, utensils, and measuring cups. Clean surfaces with white vinegar solution (1:1 ratio) before and after use. Avoid toasters shared with gluten-containing breads—opt for a dedicated toaster or oven toasting. For extra safety, bake in a cleaned cast-iron pan or on parchment paper.
Why did my bread turn out dense instead of crusty?
This usually happens from overmixing or underproofing. Knead only until the dough pulls away from the bowl (5-7 minutes total), and ensure it rises until doubled in volume (about 1 hour). For extra crust, brush with 1 tbsp warm water after 20 minutes in the oven. Preheat your oven fully (375°F) before baking.
Can I substitute flaxseed meal with chia seeds?
Yes! Use 0.5 cup chia seeds instead, but soak them in 1.25 cups warm water for 5 minutes first to create a gel. Replace the water in the recipe with this chia gel. The texture will be slightly gummier but still functional. For best results, add 1 extra tbsp gluten-free flour blend to compensate.
How long can I store this bread safely?
Wrap tightly in parchment paper or an airtight container and store at room temperature for 3-4 days. For longer storage, slice and freeze portions between parchment layers for up to 3 months. To revive, toast frozen slices in a 350°F oven for 5-7 minutes. Avoid refrigerating—it dries out the crumb faster.